HAL Properties Dialog Box
note: The HAL properties are visible only when Halogen is connected to a HAL device.
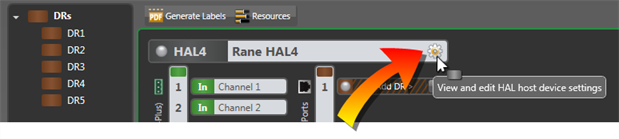
- dDouble-click the HAL bar at the top of the Hardware Map or hover over it and click the properties icon that appears:
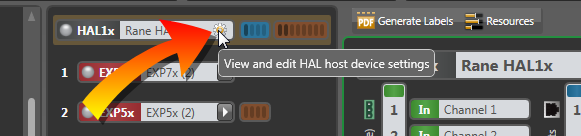
- Optionally, if the HAL includes an expansion port, double-click the HAL bar at the top of the EXP Navigation Panel or hover over it and click the properties icon that appears:
- Click the Processing tab to open the Processing Workspace.
- On the Processing Workspace toolbar, click Events to open the Event Manager dialog box.
-
Click the Adjust HAL Date/Time button located in the upper right corner of the Event Manager dialog.
From this dialog box you can name the HAL, view its current health status, set clock date and time, view or edit various network settings, and add notes specific to the device.
note: The HAL properties are visible only when Halogen is connected to a HAL device.

| UI Element | Purpose |
|---|---|
| Editable device name |
Displays a unique, editable name that identifies the associated HAL device. This name is limited to 80 characters. note: When entering names and other text, such as labels and notes, you can use nearly any Latin character and many symbols. For more details, see Allowed Display Characters. |
| Locate |
Places the HAL device in Locate Mode, which causes the Locate LEDs on the associated physical HAL device to flash. Note that there is a Locate LED on the front (on the far right) and the back (on the left) of the HAL. |
| Status | Indicates the current status of the HAL device. Click the down arrow to see more details. |
| Notes area |
A text editor in which you can create notes and comments related to this specific HAL device. Click Insert Date-Time to add a date and time stamp to an added note. A font size between 10 and 36 points can also be set for the notes. The selected text size is stored on the local machine as a user preference and is not part of the configuration file. Meaning notes are always shown in your preferred font size for any configuration you open. Device notes are associated with a specific HAL device, not with a specific configuration. In other words, even if you load a new configuration into a device, its device notes remain the same. note: When entering names and other text, such as labels and notes, you can use nearly any Latin character and many symbols. For more details, see Allowed Display Characters. |
| Adjust Date-Time Settings |
Date: Displays the current HAL date. Time: Displays the current HAL time. Time Zone: Displays the currently selected HAL Time Zone. Click the pull down arrows to select another Time Zone region and location and then click the Save button to save the new time zone to the HAL. Note that the geographic Time Zone & location selected automatically dictates if Daylight Savings Time is observed. Thus, you’ll find no toggle for Daylight Savings Time – the HAL knows from the geographic selection in the Time Zone field. warning! By default every HAL ships with the Time Zone selection set to Unspecified (UTC) or Coordinated Universal Time (UTC/GMT). Before deploying the HAL be sure manually to set the Time Zone of the final install location. Three settings dictate the HAL’s date & time. Select the one desired here.
Last Time Sync: Displays the method, date and time of the last successful sync of the HAL date-time. note: All three options for setting the HAL clock are for date and time only. Time Zone is never automatically set. By default every HAL ships with the Time Zone set to Unspecified (UTC) or Coordinated Universal Time (UTC/GMT). Setting the HAL Time Zone is a manual adjustment that must be done on initial HAL setup or any time HAL is installed in a new time zone. To initialization the HAL date and time, always: 1) Select the Time Zone settings, then click Save, then, 2) Select a Sync method and click its Sync button. tip: Every time you click a Sync button, the Time Zone is assumed to be correct. If the Time Zone is wrong for the physical location of your HAL, the HAL time will also be wrong after syncing. In other words, syncing the time sets the HAL time for the already saved & displayed time zone. Syncing happens for and in the currently saved time zone. |
| Network Settings |
Hostname: A HAL device name used for network identification purposes. A DNS Full Hostname: The Full Hostname combines the Hostname with the DHCP-assigned search domain name and is useful for network identification purposes. DHCP Enabled: Enable or disable DHCP Last DHCP Renewal: When DHCP is enabled, displays the date and time of the last DHCP lease renewal. MAC Address: A non-editable field that displays the unique MAC address Serial Number: A unique number identifying this specific HAL device. IP Addresses The IP Addresses section is a combined list of Link-Local, DHCP, and static IP addresses To add a static IP address and subnet mask, enter the IP Address and Subnet in the fields beneath the list and click the Add button. A compatible subnet mask is generated automatically based on the first octet of the new IP address. This generated subnet mask can be changed at any time. To remove a static IP address, select the row of the IP address to be removed and hover the mouse over the red X in the right-most column and click. If you are unsure if these addresses are needed, check with your network administrator. You may also want to read more about the IP address settings. Gateways The gateway section is a combined list of DHCP-assigned and static gateway To add a static Gateway, enter a new gateway address in the field beneath the list and click the Add button. To remove a static gateway, select the row of the gateway to be removed and hover the mouse over the red X in the right-most column and click. The gateway address priority ordering can be changed by selecting the row of the gateway to be moved, and clicking the up/down buttons to move the gateway to the desired position in the list. DNSs The DNS section is a combined list of DHCP-assigned and static DNS To add a static DNS, enter a new DNS address in the field beneath the list and click the Add button. To remove a static DNS, select the row of the DNS to be removed and hover the mouse over the red X in the right-most column and click. The DNS address priority ordering can be changed by selecting the row of the DNS to be moved, and clicking the up/down buttons to move the DNS to the desired position in the list. |

 See Also
- Common Features in Halogen Dialog Boxes
- Discontinued HAL Front and Rear Panels
- EXP Model Picker
- Generate Device Labels
- HAL Front and Rear Panels
- Halogen Hardware Map
- Hardware Workspace Palette
- Hardware Workspace Toolbar
- RAD and DR Model Picker Windows
- Working with DHCP, DNS, Static IP Addresses, and Gateways