To link controls together, the participating controls must be of the same type: Level control , Selector control, Toggle control, or Command control. Linking one control to another is a very simple process. Linking three or more controls is also a simple process, but requires a bit more understanding of control linking concepts. For conceptual details, see About Control Links.
- If you have not already done so, add to your Halogen Hardware and Processing Maps the two controls you plan to link. For example, if you plan to link a DR1 to a Level control, make sure you have added the DR1 to your Hardware Map and the Level block to your Processing Map.
- If you are including a hardware control in your link, confirm that the hardware device is configured correctly. For example, if you are linking a Mute control (which is a Toggle) to a DR2, you must configure the DR2's Control Mode (in your Hardware Map) as a Toggle control.
- In the Processing Workspace, locate the two controls you plan to link. In most cases, you will be linking a remote device control (DR, Logic In, Relay Out) to a control in the Processing Map. To access the controls on the processing block, open the block's properties. The remote device, or hardware, controls are located in the Control palette:

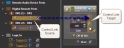
- Click the link icon on one of the controls (the control link source) and drag it to the link icon of the other control (the control link target):

- When you drop the icon from the first control onto the icon of the second control, a dialog box appears asking if you want to create a new link:
 To create the link, select the Create New Link checkbox (if it is not selected already), provide a meaningful name for the link for easier identification later, and then click OK. The link icons on both controls turn purple, indicating the link has been established and is Active (the default state for a new control link):
note: In certain situations, the link confirmation dialog box may contain up to two more choices: Add to Link and Remove from Link. This happens only if the source and/or target control is already participating in another link.
- Follow steps 1 through 3 in the above procedure. The only difference is that you are working with three or more controls.
- Choose the control that will be your control link target.
best practice: In most cases, it is best to drag your controls from the Control palette onto the controls in the Processing Map. Therefore, your control link target will most often be a control on your Processing Map.
Let's say you are linking two DR1 devices to a Level block Gain control. Given the best practice outlined above, we'll choose the Level block control as our target.
- Click the link icon belonging to the control link source and drag it onto the link icon belonging to the control link target. Using our example, the control link source would be a DR1 Level control and the control link target would be the Level control in the Processing Map:
- When you drop the icon from the control link source onto the icon of the control link target, a dialog box appears asking if you want to create a new link. To create the link, click OK. The link icons on both controls turn purple, indicating the link has been established and is Active (the default state for a new control link).
- Repeat step 3 for the other control link source. In our example, the source would be the other DR1 Level control.
- When you drop the icon from the second source control onto the target control, a dialog box appears as described in step 4. But this time, the dialog box contains an additional option. It asks if you want to add the dropped control to the link in which the target is already a participant or if you want to create a new link between these two controls:
 In this case, we want to add the control to the existing link.
 - To add more controls to this link, simply repeat steps 5 and 6 for each additional control.
Instead of dropping link icons from multiple controls directly onto another control, you can open the All Links dialog box, create a control link, and drag and drop each control onto the link. Think of the control link in the dialog box as a bucket into which you will be dropping participating controls. The following procedure outlines the steps:
- In the Halogen Processing Workspace toolbar, click Linking:

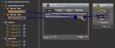
- In the All Links dialog box that displays, select the appropriate tab for the link you plan to create: Level, Select, Toggle, Command:

- Click the add icon to add a control link:

- Drag each participating control onto the control link:
tip: To verify that the link now contains all the intended participants, you can open the link and view its contents.
 See Also