This topic contains the background information you need to work effectively with HAL System presets. In addition to reviewing these conceptual details and best practices, we highly recommend that you review the included preset examples and the detailed descriptions of the various preset tasks you can perform.
A preset is basically a snapshot of one or more system blocks with their parameters set to specific values. After adjusting relevant block parameter values to fit a specific need (for example, audio for a speech-only event), you can then save those settings to a preset. Then, when it's time to set up your space for a speech-only event, the end user simply pushes a button and—like magic—the system parameters are configured correctly. Without presets, either the designer would have to configure a remote control for all relevant, configurable parameters in the system or the end user would have to go into Halogen and tweak the appropriate parameter values every time a speech-only event was scheduled—a bit impractical!
Presets are a valuable and powerful tool. Use them ... because without them, there is no way to bring back a specific group of settings.
Because the purpose of presets is to make system changes on the fly, they can only contain objects that, when changed, do not require a recompile of HAL's DSP configuration.
| A preset CAN contain the following: | A preset CANNOT contain the following: | |
|---|---|---|
| All of the blocks in the Processing Workspace: | Wiring changes | |
| I/O Processing blocks | Addition to or deletion from the Processing Map of I/O processing or DSP Processing blocks | |
| DSP Processing blocks | Addition or deletion of control link participants | |
| Control blocks | Link Master designation | |
| Activation state of one or more control links | Control link priority | |
Presets and Block Parameters
Presets store blocks, not individual parameters. In other words, when creating a preset, you customize a block's parameter values to meet your needs, and then drag the entire block into the preset (which then stores all of the block's parameter values). You cannot specify an individual block parameter to be saved in a preset.
Presets and Control Links
Presets can also store a control link's activation state. In other words, you can use a preset to activate or deactivate a control link, which can be handy in a variety of situations. For example, if you want a single DR to behave differently depending on how a room is being used, you can accomplish this behavior change by using a preset to activate and deactivate the appropriate control links. Remember, however, that you cannot use a preset to change the control link's participant list, its Link Master designation, or its priority.
note: If a block that you add to a preset contains a control that is a participant in a control link, that control link's activation state is automatically saved to the preset. If, however, you want to store only a control link's activation state to a preset without having to store any of its associated blocks, you can do so.
best practice: Because a preset cannot change a control link's priority, it is very important to confirm that your control links are prioritized correctly for the behavior that you want. It is always a good idea to double-check the control link priority list before, during, or after your creation of presets. Of course, testing your presets also helps you determine if your links are working according to plan when the presets are activated.
note: To apply a preset to a system, you either activate it or assert it. The difference between these two actions is described in detail here. For now we'll use the term apply as a generic term for turning on a preset. When you apply a preset, that preset is known as active.
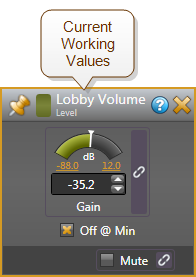
To fully understand the impact of applying a preset, it's helpful to also understand the concept of working values, which are nothing more than the current active settings in a HAL System. In other words, what you currently hear or what you currently see in the Halogen Processing Map (when connected to the HAL) are the working values. The term itself is unimportant—what matters most is understanding the relationship between preset values and working values.
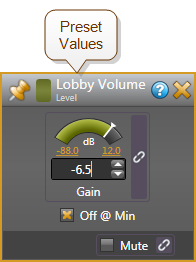
When you apply a preset to a system, the preset's block parameter values become the current working values for the corresponding blocks in your system. For example, let's assume your system contains a Level block called LobbyVolume and a preset (called Lobby) that contains the LobbyVolume block. The configuration of the block in each situation is as follows:
The following table lists the parameter values for both the current system and for the preset:
| Gain parameter | Off @ Min parameter | Mute parameter | |
|---|---|---|---|
| Current Working Values | -35.2 dB | Selected | Deselected |
| Lobby Preset | -6.5 dB | Selected | Deselected |
When you apply the preset, all of the preset's LobbyVolume block parameters become the current working values. But only one of those parameters has a different value (the Gain parameter) and is, therefore, the only system parameter that will actually change.
Now let's assume the system contains four other Level blocks: DiningVolume, KitchenVolume, OfficeVolume, and RestroomVolume. Let's also assume that you apply another preset (called Dining) that contains the DiningVolume block, but no other blocks. After applying this second preset, the working values in the LobbyVolume block reflect the Lobby preset, the working values in the DiningVolume block reflect the Dining preset, and the working values in the remaining blocks remain unchanged from their beginning values.
You should now have a basic understanding of how a preset affects the working values of a system. But there's more to learn before you can work effectively and efficiently with presets. For example, as you have seen in this example, you can layer presets on top of one another, with each preset affecting only the blocks it contains. All other working values remain the same. But what happens if the same parameter is contained in multiple active presets with a different value in each one? And here's another question: Once you turn a preset on, can you turn it off?
Keep reading to learn more!
You can include the same block in as many presets as you want (although we recommend against including the same block in different preset types—see the next section for details). So what happens if more than one of those presets is active? How do you know which preset values are used by the system?
The preset values that take precedence are always the ones most recently applied to the system. In other words, the system keeps track of the presets as they are applied and places them in priority order. If you apply PresetA, then PresetB, then PresetC, the Active Presets list (which you can view in the All Presets dialog box) would like this:
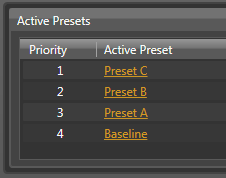
As you can see, the most recently applied preset has the highest priority. So how does that play out for block parameters that exist in multiple presets? To find out, let's follow the life of a single block as multiple presets are applied. We'll use a RAD1 Mic Input block for this example. Following is a screen shot of its properties dialog box, showing all of its parameters:
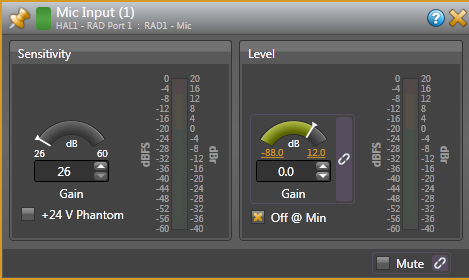
As you can see, this block contains the following parameters:
- Sensitivity Gain (slider control)
- +24 V Phantom power (checkbox control)
- Level Gain (slider control)
- Off @ Min (checkbox control)
- Mute (checkbox control)
Let's assume there are three presets, each of which contains this RAD1 Mic Input block. The preset values for the block parameters are as follows:
| Block Parameters | PresetA | PresetB | PresetC |
|---|---|---|---|
|
Sensitivity Gain |
26 | 37 | 26 |
|
+24 V Phantom Power |
Not Checked | Checked | Checked |
|
Level Gain |
-60 | -41 | -60 |
|
Off @ Min |
Checked | Not Checked | Not Checked |
|
Mute |
Not checked | Not Checked | Checked |
Now let's look at what happens to each block parameter as a new preset is applied. We'll apply PresetA, then PresetC, and then PresetB. Each table below shows the working values before and after the preset is applied.
Apply PresetA
| Block Parameters | Working Values Before Applying Preset | Working Values After Applying PresetA |
|---|---|---|
|
Sensitivity Gain |
43 | 26 |
|
+24 V Phantom Power |
Not Checked | Not Checked |
|
Level Gain |
-34.6 | -60 |
|
Off @ Min |
Checked | Checked |
|
Mute |
Not Checked | Not Checked |
Apply PresetC
| Block Parameters | Working Values Before Applying Preset | Working Values After Applying PresetC |
|---|---|---|
|
Sensitivity Gain |
26 | 26 |
|
+24 V Phantom Power |
Not Checked | Checked |
|
Level Gain |
-60 | -60 |
|
Off @ Min |
Checked | Not Checked |
|
Mute |
Not Checked | Checked |
Apply PresetB
| Block Parameters | Working Values Before Applying Preset | Working Values After Applying PresetB |
|---|---|---|
|
Sensitivity Gain |
26 | 37 |
|
+24 V Phantom Power |
Checked | Checked |
|
Level Gain |
-60 | -41 |
|
Off @ Min |
Not Checked | Not Checked |
|
Mute |
Checked | Not Checked |
In essence, when working with presets, simply remember that the working values of a system block always reflect the values found in the most recently applied preset that contains that block. If no preset has affected a specific block, that block continues to reflect its original (or default) values.
There are three preset control types—Toggle, Selector, and Command. Regardless of its control type, each preset accomplishes the same thing—it overwrites the system's current working values with its stored values. So why are there different control types? The primary reason is to provide flexibility in how you and your end users can control the preset. The control type you choose determines some of the preset's characteristics, which in turn affects control of the preset.
For a better understanding of the three preset control types, review the sections below:
One of the first things to understand and one of the first things to decide when creating HAL System presets is whether you want to assert Command presets or activate and deactivate Toggle and/or Selector presets. The difference between these two approaches is really quite simple. Whereas you can turn Toggle and Selector presets on (activate) and off (deactivate), you can only turn Command presets on (assert).
note for drag net users: Asserting a Command preset is the same as recalling a Dragnet preset.
Whether you assert a Command preset or activate a Toggle/Selector preset, the system does the same thing. It places that preset at the top of the Active Presets list—which means its parameter values overwrite the current working values for the corresponding system parameters. When you deactivate a Toggle/Selector preset, the system removes it from the Active Presets list. You cannot, however, remove or un-assert a Command preset. The Command preset remains at the top of the list until you assert another Command preset or activate a Toggle or Selector preset, which is then placed above it in the list. But even though the original Command preset drops in the priority list, it is still active. The working values changed by the Command preset remain the same until another preset changes them.
note: If a preset, regardless of its control type, appears anywhere in the Active Presets list, that preset is active. The working values of the parameters for a specific block reflect the values in the highest priority preset that contains that block.
To thoroughly understand what happens when you activate and deactivate presets, you need to understand what the Baseline preset is and how it works. You can find details about the Baseline in the next section, but for now you can think of the Baseline as your default system settings. The Baseline is a Command preset, is customizable, and is always present and active. Therefore, if no other presets are active when you deactivate a preset, the system falls back to its default settings (the Baseline), because the Baseline is always active and cannot be deleted.
Although there may be times when a Command preset best fits your needs, there are distinct advantages to using presets that you can activate and deactivate. To illustrate these advantages, let's take a look at a simple example.
Suppose you need a preset that mutes and un-mutes a specific output.
note: In reality, you could use a simple control link for this scenario, but we'll use presets for now to help illustrate activate/deactivate versus assert.
Activate/Deactivate Approach: You could create a Toggle preset that contains the appropriate Level or Output block with its Mute parameter selected. When you activate the preset, the audio affected by that block is muted. When you deactivate the preset, the block parameter values fall back to the next preset in the priority list that contains this block. If no other preset is active that contains this block, it falls back to your system default settings (the Baseline). Assuming the default Baseline value for this Mute parameter is deselected (un-muted), deactivating the Toggle preset un-mutes the audio. In essence, you activate the preset to mute the audio and then deactivate the preset to un-mute the audio.
Assert Approach: If you were to use a Command preset in this scenario, you would assert the preset to mute the audio. But remember that you cannot un-assert a Command preset. So how would you un-mute the audio? You would need to create a second Command preset with the Mute parameter deselected. To un-mute the audio, you would assert this second preset. So, as you can see, when you use Command presets, you generally need to create them in pairs—one preset that contains the desired parameter values and another that returns you to the previous state. You can also assert the Baseline preset (the system default settings) over the currently active Command preset, but remember that the Baseline includes all blocks and would override ALL active presets no matter their control type. Further, since both Command presets become active, there is no way for an end user to know which preset is in effect without hearing the result. A Toggle or Select control displays the state of preset activation (on a checkbox or radio button), which shows the restaurant manager or bar owner the state of the audio system without forcing them to leave their office to wander around deducing the state of their audio system.
So what are some other characteristics that distinguish the three different preset types from one another? And how do you decide which type to use?
| Characteristic | Toggle Preset | Selector Preset | Command Preset |
|---|---|---|---|
| How to apply the preset |
Activate/Deactivate When deactivated, falls back to the next preset in the preset priority list. |
Activate/Deactivate When deactivated, falls back to the next preset in the preset priority list. |
Assert Cannot be un-asserted. |
| How to control the preset |
Acts like a checkbox in a software application. End user can select it (to activate it) and deselect it (to deactivate it).
|
Acts like a radio button in a software application. Selector presets appear in groups of two or more and are mutually-exclusive. Only one preset in the group can be selected at any given time. Can add a No Selection option, which when selected deactivates all the Selector presets in the group.
|
Acts like a button in a software application. In software, you click the button and the action occurs. You cannot undo the action. The same is true for a Command preset. The end user pushes the control knob and the preset is asserted. The end user cannot undo the action.
|
| Relationship to other presets | Can be selected or deselected independently from other presets, even if they are listed together. | Contained in a mutually-exclusive group of presets. Only one preset in the group can be active at a given time. | Can be asserted independently from other presets. Asserting or activating another preset overwrites any parameters common to both presets. Command presets are often created in pairs - one to change the system and another to undo the changes. |
| Ability to determine which presets are active | Can quickly view on DR LCD screen (and in Halogen software) if preset is active or not | Can quickly view on DR LCD screen (and in Halogen software) which preset is active, or if no presets are active (No Selection is selected). | No visible indication that a Command preset has been asserted. A big disadvantage to Command presets. Must inspect the Active Priority list to determine which Command presets are active. |
| Compatible remote devices | DR2 and DR3 (must be configured with Toggle controls), Logic In (configured as Toggle control) | DR2 and DR3 (must be configured as Selector control), Logic In (configured as a Two Position Selector) | DR2 and DR3 (must be configured with Command controls), Logic In (configured as Command control) |
| Recommendations for use | Useful for a single preset that the end user can turn on and off. You can also create a list of multiple Toggle presets, but you should do so only if those presets are unrelated or if you intentionally need to create presets that can be layered. | Useful when you have a variety of presets for a single space and only one of the presets is valid at a time. | Useful if this is the preset model you are used to (from using Dragnet or other products that treat presets in this way). Creating pairs that work together helps avoid confusion and problems. |
| Pros and Cons |
Pros: Can always tell which presets are active. Only need to include the relevant blocks in the preset. Can activate and deactivate, thus need only one preset. Cons: If you're used to products that use an assert method, you'll need to adjust to this new way of controlling presets. |
Pros: Can always tell which presets are active. Only need to include the relevant blocks in the preset. Can activate and deactivate, thus need only one preset. Can easily create a group of mutually-exclusive presets. Cons: If you're used to products that use an assert method, you'll need to adjust to this new way of controlling presets. |
Pros: No learning curve required if you have been using other products that use the assert approach to presets. Cons: Is difficult for the end user to quickly ascertain what state the system is in, to know which preset has been asserted. Is usually best to create presets in pairs, thus requires more work than if using Toggle or Selector presets. |


best practice: Try to avoid including the same blocks in different types of presets (with the exception of the Baseline, of course, as it contains every block in the system. Including the same block in different types of presets makes management of the presets and the block parameter values much more difficult. It's okay to use different preset types as long as they are independent from one another (again, the Baseline is an exception).
best practice: Avoid asserting the Baseline unless you are using only Command presets. Asserting the Baseline over a Toggle or Selector preset creates a dilemma. To then place the Toggle or Selector above the Baseline (in the Active Presets list), you would have to deactivate and then re-activate it.
The Baseline preset, which contains default settings and link activation states for all the processing and control blocks in your system configuration, serves as a foundation for your system. It is a Command preset and, therefore, can never be deactivated. Also, unlike other Command presets, the Baseline can never be deleted. It is always there to serve as the default fallback preset when no other presets are active. You can also configure the system to assert the Baseline on startup.
tip: Here is an easy rule to remember: If no preset is currently acting on a particular block in your system, the block returns to the parameter values saved in the Baseline.
So how is the Baseline created? As soon as you open Halogen or click New on the system toolbar to begin a new configuration, Halogen creates the Baseline preset automatically (although it is initially empty). When you add a block to your Processing Map, that block is automatically added to the Baseline—with its default parameter values. When you add a control link, the Baseline stores the link's default activation state. Thus, the Baseline always contains every block, every hardware control, and the activation state of every control link that is present in your system.
Although Halogen creates the Baseline for you, the initial parameter values stored in the Baseline may not be appropriate for your particular system. No problem. You can easily customize all the Baseline parameter values. In fact, we highly recommend that you review and customize your Baseline before you begin creating other presets.
best practice: Early in your design process, decide what the default state should be for each block, hardware control, and control link in your system, configure these items accordingly, and save them to your Baseline. You can configure your entire system and save it to the Baseline all at once, or you can move from block to block, saving each block to the Baseline as you go. See Customizing the Baseline Preset for procedural details.
The Baseline in Action
So how do you actually work with the Baseline once your system is up and running? The answer depends on what it is you're doing and how you've configured your system presets.
If most or all of your presets are Toggles or Selectors (presets that can be activated and deactivated), your Baseline will serve as the fallback position when none of your Toggle or Selector presets are activated. Let's say you have a Toggle preset that enables a DR in a room that is used only occasionally. When the room is not in use, you want the DR disabled. In this case, you would likely configure the DR as disabled in your Baseline. Then, when the room is in use, the end user activates the Toggle preset that enables the DR. When the room is no longer in use, the end user deactivates the Toggle preset, which causes the DR settings to fall back to their Baseline values—in this case disabling the DR. The behavior would be different, of course, if another active preset containing this DR block existed above the Baseline in the Active Presets list.
best practice: Although you could return to the Baseline by asserting it over your activated Toggle and/or Selector presets, causing it to overlay every block in the system, we recommend against this practice. Because you cannot deactivate the Baseline, the only way to then get one of the lower priority Toggle or Selector presets above the Baseline is to deactivate and then activate it—a needless complication. The best way to return to the Baseline is to deactivate your Toggle and Selector presets.
Command presets cannot be deactivated. They can only be asserted.
System Startup Options: You can configure HAL to power up into one of two possible states: its most recent state or the baseline preset. For details, see Configuring HAL Bootup Behavior.
warning! When you click Save Baseline in the Processing Workspace toolbar, all blocks in your Processing Map are saved to the Baseline with their current parameter values. If you only want to save the values for one block or a subset of blocks, do not click Save Baseline! You can instead update the Baseline for only that block or subset of blocks. For details, see Updating the Baseline Preset.
The first step when creating a preset is to decide how the preset should be controlled. Which approach do you plan to use—assertion or activation/deactivation? Will the preset be controlled by end users? If so, what type of remote hardware device are you using? Is the preset a standalone item or one of several choices? The answers to these questions help you choose which type of preset to create.
Once you have decided on a preset control type, you then open the All Presets dialog box and create the initial (empty) preset into which you will drag and drop the appropriately configured blocks and controls that are relevant to the preset. Depending on the type of preset you are creating, the procedure differs slightly. See Creating Presets for details.
tip: There are many ways to approach creation of a preset. You can set up the whole system and then drag the relevant blocks into the preset (remember that you can select and drag multiple blocks at once) or you can focus on one block at a time, dragging it into the preset when you finish the block's configuration. For particularly complex systems, the latter approach may prove easier to manage.
This is the easy part! Once you've created your preset, you simply use control linking to provide end users with access to the preset. You create a control link that connects the preset to an appropriate remote hardware device. For example, if you created a Selector preset, you could link that preset to a DR2, DR3, or Logic In that is configured to behave as a Selector. If you created a Toggle preset, you could link it to a Logic In device, or to a Toggle control displayed on a DR2 or DR3. If you created a Command preset, you could link it to a Command control displayed on a DR2 or DR3 or to a Logic In configured as a Command control.
For procedural details, see Linking a Preset to a DR or Other Remote Device.
Yes you can. HAL System presets contain a handy feature called Scratch Pad, that tracks and stores changes made to any of the preset values.
note: By changes, we mean changes made dynamically, usually by an end user, not changes actively saved to the preset itself.
Let's walk through an example to illustrate how Scratch Pad works. Suppose your system contains a preset that configures a room's audio for Friday Night Bingo. The same crowd usually shows up every Friday night and it seems they always have to turn up the volume to hear the announcer. Wouldn't it be nice if each time you activate your Friday Night Bingo preset, it could return the room to the settings as adjusted by the Bingo audience members instead of returning to the original preset values? With Scratch Pad, you can do this! You simply enable the Scratch Pad feature for the Friday Night Bingo preset. It then keeps track of any changes made to any of the preset's block parameters. The next time you activate Friday Night Bingo, it remembers the last change the Bingo attendees made to the volume and returns that value.
Scratch Pad works on a preset level, never affecting any preset other than its own. In other words, each preset has its own, dedicated Scratch Pad. By default, a preset's Scratch Pad is disabled. For details on enabling it, see Enabling/Disabling Scratch Pad. You cannot enable the ScratchPad for a subset of the preset's blocks. Once enabled, it monitors the preset parameters for all of the preset's blocks and if one of them changes, it tracks the change. If the same parameter changes again, the ScratchPad overwrites the old change with the new one—thus it keeps only the last value for each changed parameter. When the preset is activated again, it uses the ScratchPad values.
Resetting or Disabling the ScratchPad
So what happens if, once the ScratchPad is enabled and begins saving changed parameter values, you want to return to your original preset values? Rest assured that those original values are safe and sound and never altered by the ScratchPad. The HAL System provides you with two options for returning to those values:
- Disable the ScratchPad: When you disable the ScratchPad, the preset returns to its original values the next time it is applied, the ScratchPad values disappear, and the ScratchPad no longer tracks changes to the preset values.
- Reset the ScratchPad: When you reset the ScratchPad, its values return to those of the original preset, but it is still enabled and will continue tracking any changes to those values. You should always deactivate a preset before resetting its ScratchPad. If you tried to reset an active preset's ScratchPad (in other words, the preset's ScratchPad is tracking the current working values of the system), nothing would change. This may sound confusing, but it's actually quite simple. If you reset an active preset's ScratchPad, the ScratchPad's values return to the original preset values but the ScratchPad then immediately saves the current working values—as that's its job. So, in essence, you're back where you started before you reset the ScratchPad.
best practice: Avoid performing a ScratchPad reset when the preset is active.
Controlling the ScratchPad
If you decide to use the ScratchPad feature, you will likely control it from within the Halogen software. If, however, you need to expose a control for enabling, disabling, and/or resetting the ScratchPad, you can do so using control links. The ScratchPad's two controls—the Enable/Disable Toggle control and the Reset Command control—can be linked to a DR or some other remote hardware device. We do not recommend exposing this control to end users, however, unless they have a thorough understanding of the ScratchPad's purpose and behavior.
There are a variety of work flows you can use when creating presets, but we recommend the following:
-
Establish your Baseline preset
- Create the default parameter values for all the blocks in your system.
- Create and test the control links you want in your system (in its default state).
- Save everything to your Baseline preset.
- Decide what preset control type best fits the scenario for which you are creating a preset.
- Open the All Presets dialog box and add a new preset (of the control type you have decided upon).
- For each block you want to save to the preset, configure its parameters appropriately and test the behavior (including relevant control links). When all blocks and control links are created and tested, select the relevant blocks and drag them into the preset.
- Test the preset.
- Return to (or assert) your Baseline preset and begin at step 3 to create your next preset.
- Repeat steps 3 through 6 until you have created all the presets you need.
- If several presets contain the same block or control link, test their interactions and make any necessary adjustments in to get the behavior you want. Be sure to review the control link priorities.
- Test all presets.
An alternate approach:
- Create your Baseline preset as outlined in the above procedure.
- Create all your anticipated presets in the All Presets dialog box. These presets will be empty until you add the relevant blocks.
- Drag a block into all the presets that should contain it.
- Click the square in the middle of the blue preset bar at the bottom of the block to open the block's Preset References dialog box.
- Configure that block appropriately for one of the presets.
- In the Preset References dialog box, click Update for the relevant preset.
- Reconfigure the block for another of the presets and then click Update for that preset.
- Continue until you have added the properly-configured block to all the presets that contain it.
- Repeat steps 3 through 8 for each system block contained in one or more of your presets.
- If more than one of your presets contain control links, review the control link priority list to adjust their priorities, if necessary.
- Test all presets.
best practice: Early in your design process, decide what the default state should be for each block, hardware control, and control link in your system, configure these items accordingly, and save them to your Baseline. You can configure your entire system and save it to the Baseline all at once, or you can move from block to block, saving each block to the Baseline as you go. See Customizing the Baseline Preset for procedural details.
best practice: Name your presets as soon as you create them. This helps alleviate confusion later. Note that all preset names must be unique.
best practice: When creating presets, a good approach is to think through and configure blocks for the entire preset, test the functionality, and then select all the relevant blocks and drag them to the preset.
best practice: Try to avoid including the same blocks in different types of presets (with the exception of the Baseline, of course, as it contains every block in the system. Including the same block in different types of presets makes management of the presets and the block parameters values much more difficult. It's okay to use different preset types as long as they are independent from one another (again, the Baseline is an exception).
best practice: Avoid asserting the Baseline unless you are using only Command presets. Asserting the Baseline over a Toggle or Selector preset creates a dilemma. To then place the Toggle or Selector above the Baseline (in the Active Presets list), you would have to deactivate and then re-activate it. In this scenario, the best way to return to the Baseline is to deactivate the Toggle and Selector presets.
best practice: Because a preset cannot change a control link's priority, it is very important to confirm that your control links are prioritized correctly for the behavior that you want. It is always a good idea to double-check the control link priority list before, during, or after your creation of presets. Of course, testing your presets also helps you determine if your links are working according to plan when the presets are activated.
best practice: Avoid performing a ScratchPad reset when the preset is active.
warning! When you click Save Baseline in the Processing Workspace toolbar, all blocks in your Processing Map are saved to the Baseline with their current parameter values. If you only want to save the values for one or a subset of blocks, do not click Save Baseline! You should instead update only those specific blocks in the Baseline. For details, see Updating the Baseline Preset.