Before troubleshooting a connection issue, it may help if you understand the basics of how Halogen discovers and then establishes communications with a HAL. HAL devices send occasional UDP broadcast messages. RaneLink II (a Windows Service installed with Halogen that helps establish communication with HAL devices) listens constantly for these messages and, when it receives one, does the following three things, if necessary: It sets up a temporary link-local IP address (in other words, the address is cleared when the computer reboots) on the appropriate network interface card (NIC). It also adds an entry to the computer's network route table. This entry tells Windows and Halogen which NIC to use for communicating with the HAL. The same UDP messages also indicate to Halogen that a HAL device is on the network, so it can be displayed in the Connect to Device dialog box. Lastly, so that it can receive system status updates, RaneLink II opens and maintains a TCP connection with the HAL.
note: To review the list of processes required for a HAL connection, see Required Processes for Communicating with HAL.
If no HAL devices appear in the Connect to Device dialog box, you may have a connectivity issue. Following are some suggested actions to take
When a HAL is located behind a router, you must type the HAL's IP address into the Search box in the Connect to Device dialog box before Halogen can discover and display the HAL, making it available for a connection.
warning! Halogen can discover a HAL behind a router only if the router is NAT-enabled (in other words, the router is able to perform Network Address Translation).
It can sometimes take up to two minutes for Halogen to establish the network settings and communications it needs (within Windows) to connect to the HAL. During this time, Halogen may be waiting for DHCP server detection, Windows’ networking timeouts, or simply trying to complete its negotiation with the HAL device. When you first power up a HAL, its internal power-up routine can take a while to complete.
Is the HAL Ethernet connection functioning properly? Check the Comm indicator on the front panel of the HAL. If it is blinking, that's an indication that at least one PC running the RaneLink II service has discovered the HAL. If the Comm light is not blinking, possible culprits are the Ethernet cable or the network switch. Verify that the Ethernet cable is securely plugged into the HAL. You know it is secure when the Link light is solid green and the LAN light is blinking yellow.
If you’ve practiced patience and verified the Ethernet connection and it hasn’t paid off, it’s time to try something else. The most common culprit at this point is your firewall (either the Windows firewall or a third-party firewall), or maybe your virus protection software. One or both of these applications may be preventing communications. To avoid this problem, add the Halogen and hal1.pcops executables as well as the RaneLink II service (and both the TCP and UDP port 4994) to your virus protection and firewall exception lists. The file names and default locations are listed below:
C:\Program Files\Rane Corporation\Halogen\Halogen.exe
C:\Program Files\Rane Corporation\Halogen\hal1.pcops.exe
C:\Program Files\Rane Corporation\Halogen\python.exe
C:\Program Files\Rane Corporation\RaneLink\RaneLink.exe
note: You may need to reboot your computer after adding these files to the exceptions list.
note: For a complete list of ports that Halogen and RaneLink use to communicate,
Halogen employs a communications service called RaneLink II that helps control the connectivity with any HAL devices on the network. RaneLink II is a communications application created by Rane that runs in the background, aiding Halogen in locating and connecting to HAL devices on the network. To determine if RaneLink II is running, check for its existence and status in your computer’s Services list, as described below:
Open Task Manager by either right-clicking an empty area on the taskbar or by pressing Ctrl-Shift-ESC. Click the Services tab. Look for RaneLink II in the list of services (you can sort the list by service name) and verify that its status is Running.
If RaneLink II is not present or not running, try rebooting your computer, and then checking its status again. If RaneLink II seems stuck and unable to be restarted, terminate the current RaneLink.exe process (by selecting it in the Task Manager Processes list and then clicking End Process). If you do not see RaneLink.exe in the Processes list, press the Show processes from all users button in the Task Manager. Upon termination, the RaneLink II service should start up again automatically. If not, you can restart it manually as described above. Verify that the Windows Application Event log is not full. If it is full, clear it and then set it to overwrite events as needed.
If RaneLink II fails to start after trying all the above options, it’s time to call Rane Technical Support . If you are familiar with the Windows Event Viewer, viewing any messages related to RaneLink II may shed some light on the problem. However, we highly recommend calling Rane for assistance.
Halogen includes a handy network troubleshooting dialog that shows if your PC is receiving UDP broadcast announcements from the HAL device(s) on the network. To run this tool, do the following:
-
From the Device menu in the Halogen application toolbar, click Connect:

- In the Connect to Device dialog that appears, open the HAL network troubleshooting window by clicking on the Troubleshoot button at the bottom, right corner of the window.
- To begin monitoring HAL broadcast messages, click on the Start button in theTroubleshoot HAL Connectivity dialog that appears.
- If any of the NICs (Network Interface Cards) on your PC are receiving UDP advertisements from one or more HAL devices on the local network, the messages will appear in the Listen For HAL Broadcast Messages area of the dialog:
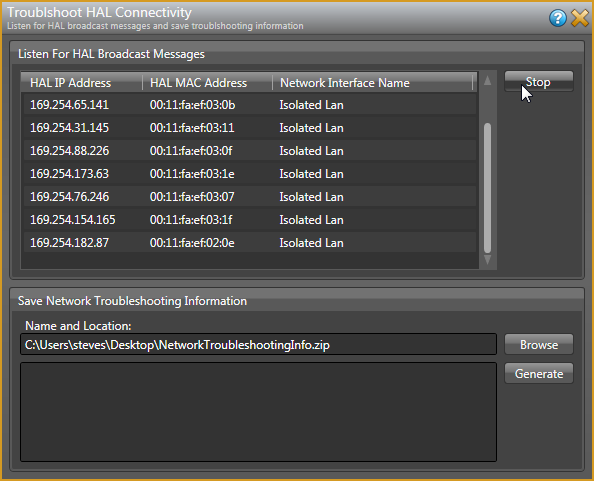
If these broadcast messages do not appear, this indicates a connectivity problem and you will not be able to connect to a HAL device on the local network until the problem is corrected. Try power cycling the HAL and then repeating this step.
If the HAL is not found after power cycling, verify that the computer’s link-local IP address intended for use by the HAL is on the network interface card (NIC) controlling the connection to the HAL. To guarantee that the correct NIC is used, you can try disabling all other NICs on the PC except for the one connected to the same network as the HAL, and then restart the PC.
Halogen establishes a link-local IP address for use in establishing communications with the HAL. Because most computers contain multiple NICs, it is possible that the link-local address has been assigned to the wrong NIC or assigned to the wrong route table. You can determine if this problem exists by following the procedures below:
- To determine if the link-local IP address has been assigned to the proper NIC:
Windows 7: Click Start, click Control Panel, click Network and Sharing Center, click the network link associated with the connection on which the HAL resides, and then click the Details button in the dialog box that displays. Verify that the first two numbers of one of the IP addresses are 169.254. The second two numbers can be anything between 0 and 255.
Windows 8 or later: Click Start, begin typing "Network and Sharing", click Network and Sharing Center from the top of the list, click the network link associated with the connection on which the HAL resides, and then click the Details button in the dialog box that displays. Verify that the first two numbers of one of the IP addresses are 169.254. The second two numbers can be anything between 0 and 255.
- To determine if HAL’s link-local IP address has been assigned to the wrong NIC:
Open a DOS command box (as described in step 6). At the DOS prompt, type route print. The route table displays. Scan the list of IP addresses, looking for one or more that begin with 169.254. Verify that they are assigned to the proper NIC. If the IP address has been assigned to the wrong NIC, or if you do not see the address at all, please contact Rane Technical Support.
If your computer is administered by an IT department, you may need their help. Refer them to Ethernet Ports and Protocols as well as Required Processes for Communicating with HAL. They can find more information in the Halogen Help System by searching on network traffic. Perhaps you are the IT department. In that case, these IT topics are meant for you!
 See Also