Although listed as the second task in the installation process, this task can occur later in the process if necessary. To help with troubleshooting, however, we recommend loading the configuration file prior to installing the EXPs, RADs and DRs.
note: If you do not have a configuration file, but you want to test that the equipment is working properly, you can create a very simple configuration for verification purposes. It’s best to do this after installing the EXPs, RADs and DRs. See Task 7: Verify and Troubleshoot Installation.
To load a configuration file into a HAL:
- Verify that the HAL is powered on and working properly.
- If you haven’t done so already,
- Connect your computer to the HAL. You have two options: connect your computer directly to the HAL or, if the HAL is connected to a network, connect your computer to that same network.
- If making a direct connection, you’ll need to plug a standard Ethernet cable or a crossover cable into the Ethernet port on the HAL and on your computer. A crossover cable is included with the HAL equipment.
- If connecting to the network, you can connect your computer to the same network switch to which the HAL is connected or connect to the network in some other way. For example, if a wireless access point is available, you may want to use it so that you can roam with a laptop and still communicate with the HAL. To connect to a switch, plug one end of a standard Ethernet cable (or crossover cable) into the Ethernet port on the HAL and the other end into a port on the network switch.
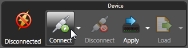
- Connect to the HAL device:
- From the Device menu in the application toolbar, click Connect
- In the Connect to Device dialog box that appears, find the HAL device you want
- Click the Connect button associated with that HAL device.
- Load the configuration file:
- From the Device menu on the application toolbar, click Load.
- From the Browse dialog box that opens, search for and select the configuration file you want to load.
- Click Open to load the file.
- Check to see if the audio designer included any special notes with the configuration file. To do so, click Notes in the Edit area of the Halogen application toolbar.
- If you need to provide a custom name for the HAL device, open its properties by double-clicking its title bar (in the Hardware Workspace) or by hovering and clicking the properties icon that appears in its title bar. Customize its name in the edit box located at the top of its properties dialog box:

- Make any other edits necessary to complete the configuration. Typically, none are needed.
note: The configuration settings are immediately applied and saved to the HAL. If the HAL detects any mismatches between the configured peripheral devices and the physical peripheral devices connected to the HAL, these mismatches are reported in the Hardware Workspace. If you are loading the configuration prior to installing any peripheral devices, each configured port will report an error because it expects to find a specific device, but instead it finds nothing. When the correct device models are installed, these errors disappear.
note: This device name is saved to the device, but it is not saved to the configuration file. This is also true for any notes you may enter in this properties dialog box.
 See Also
- About the Installation Process
- Task 1: Install and Connect HAL
- Task 2: Configuring HAL
- Task 3: Pulling and Terminating shielded CAT 5e Cabling
- Task 4 (legacy): Installing and Connecting HAL1 Expansion Units
- Task 4: Installing and Connecting HAL Expansion Units
- Task 5: Installing and Connecting RADs and DRs
- Task 6: Installing and Connecting Analog Devices
- Task 7: Verify and Troubleshoot Installation