note: The HAL1 and EXP1 are legacy devices that are no longer available. This material is included as reference only.
Installing and connecting an EXP1 to the HAL1 is simple. Just as with the HAL1 device, you can rely on the EXP1's LED indicators to provide you with basic device and connection status information. The first EXP1 that you install connects directly to the HAL1. Subsequent EXP1 devices can be installed but are then daisy-chained together. You will need FireWire cables to connect these devices.
note: The HAL1 supports a maximum of four EXP1 devices.
To install a single EXP1 device:
- Attach the EXP1 device to the audio rack.
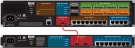
- Connect the EXP1 device to the HAL1. You need a FireWire cable for this connection, with a maximum cable length of 15 feet. To connect the EXP1 to the HAL1, plug one end of the FireWire cable into the Expansion Bus on the HAL1. Plug the other end of the cable into one of the Expansion Bus slots on the EXP1. You can use either one of the slots:
When HAL1 recognizes the EXP1 device, the Link light on the EXP1 turns green.
To install more than one EXP1 device:
- Install the first EXP1 as described above, connecting it directly to the HAL1.
- Attach the remaining EXP1 devices to the audio rack.
- Daisy chain the EXP1 devices together. In other words, connect the second EXP1 device to the EXP1 that is connected to the HAL1. To do so, plug one end of the FireWire cable into the open Expansion Bus slot on the first EXP1. Plug the other end of the cable into one of the Expansion Bus slots on the second EXP1. Then, using another FireWire cable, repeat this process, connecting the third EXP1 to the second EXP1, and so on:

 See Also
- About the Installation Process
- Task 1: Install and Connect HAL
- Task 2: Configuring HAL
- Task 3: Pulling and Terminating shielded CAT 5e Cabling
- Task 4 (legacy): Installing and Connecting HAL1 Expansion Units
- Task 4: Installing and Connecting HAL Expansion Units
- Task 5: Installing and Connecting RADs and DRs
- Task 6: Installing and Connecting Analog Devices
- Task 7: Verify and Troubleshoot Installation