Wiring Blocks
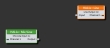
To configure the audio routing you want, wire together the blocks you have dragged into the Processing Workspace. Each block contains one or more nodes which you use to make a connection/wire. The input nodes are on the left, while the output nodes are on the right:
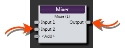
Halogen displays all blocks in the processing map in this orientation (inputs on the left and outputs on the right) so in most cases the best workflow is to wire the blocks together from left to right, that is from block output to block input. You can connect a single output node to any number of input nodes.
This section provides an overview of the many ways Halogen allows you to wire your blocks together, including ways to route the wires to keep your processing map looking good, and also tips for how to spend less time wiring. All wiring is done in the Processing Workspace and to get there, click in the Processing tab in the upper right area of the Halogen application window.
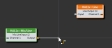
You can create a new wire by clicking once on one node and moving your mouse cursor to the destination block. As you move the cursor, a virtual wire appears:
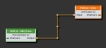
To make the connection, click on the destination node:
tip: Tip: Hover the cursor over the title bar of a block to automatically snap the wire to the first available node on the block. To wire to a different node hover the cursor over that specific node and the wire snaps to that node.
You know you are creating a new wire because the cursor looks like this:
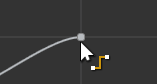
Also, the horizontal and vertical lines that appear are guides to help you align the wire with other items on the processing map.
If you connect two nodes correctly, the wire appears solid and gold because it becomes selected. If you click on something else in the processing map, the wire appears as solid gray.
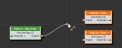
If there is a problem with your intended connection, Halogen prevents that connection and displays the wire in as a dashed red format. An example of an invalid connection is attempting to connect one output to another output:

The simplest way to connect two blocks is to follow the simple step above: click on one node, move your mouse cursor, then click on the destination node. Because the processing map may contain many blocks and wires, wiring everything in this way can make it difficult for you to see the signal flow or to use the blocks in the map. To dramatically help with the problem, Halogen allows you to make a custom path for your wire by clicking at empty processing map positions along the way as you create a wire. Also, see Highlighting Wires for information on how to easily see the wires connected to a particular block in your processing map.
After you’ve started a new wire, each time you click on an empty position in the processing map Halogen creates a vertex at that location, which allows your wire to bend at that point. You can route a wire in the path you want by clicking on the processing map at each place you want the wire to bend, finally arriving at the destination node. When you click on the destination, Halogen creates the wire as you’ve routed it.
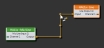
For example, suppose you want to connect the two blocks below with a wire that contains two bends:
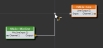
1) First click on the output node to start a new wire.
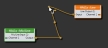
2) Next move your mouse cursor horizontally and click on the processing map to create the first vertex:
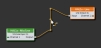
3) Move your mouse cursor vertically so that it lines up horizontally with the input node. You can use the horizontal guide to help you know when your cursor is aligned with the node:
4) Click on the processing map to create the second vertex.
5) Move your mouse cursor to the destination node and click. Voila, you have a new wire that follows your chosen path in the processing map:
In Halogen, the wire section between a node and a vertex or between two vertices is called a segment. In the above example, you made a multi-segment wire.
Sometimes when you get part way though making a multi-segment wire you might wish to stop before clicking on the final destination. You can do this by pressing the Esc (Escape) key, which terminates the wire, keeping all of the segments that you have created so far. You can later continue creating another, second wire that continues the first by double-clicking on the wire’s end:

Some people like to have their wires always vertical or horizontal, so that all bends are at right angles. This is known as orthogonal wiring. You can always do this yourself by being careful when placing each vertex as you create a new wire. Halogen has a way to help you do this, however. The Settings menu includes a toggle that always enforces Orthogonal Wires.

When this is on (which is the default), Halogen makes all segments either horizontal or vertical as you create new wire segments. This means you don’t have to be as careful when routing a wire to make sure your mouse is always in the right place. Just create your wire and it comes out with orthogonal bends.
If you don’t have the ‘Orthogonal Wires’ setting checked, Halogen places each vertex at the nearest position to your mouse cursor when you click on the processing map. This is very flexible and lets you create diagonal segments as well as horizontal and vertical segments.
If you want to occasionally create a wire segment using orthogonal wiring, you don’t have to turn on ‘Orthogonal Wires’ in the setting menu. Simply press the ‘o’ key (for orthogonal) when you are creating a wire and Halogen enters orthogonal mode as long as you hold down the 'o' key.
Once you have a wire in the processing map, you may want to change the path to improve appearance or better position the wire when adding new blocks and wires.
To add a new vertex to an existing wire, simply move your mouse cursor over the wire at the position you want to create the vertex and double-click, or right-click and select Add Vertex in the context menu.
You can remove an existing vertex by right clicking on it and selecting the ‘Delete Vertex’ menu item that appears.

It is possible to move a vertex. To do so, first select the wire by clicking on it. The movable vertices appear as small rectangles at the ends of each segment when you have selected a wire. Left click on the vertex you wish to move:
Then, drag it to your desired position, then release the mouse:
Notice that the segments connected to that vertex change to accommodate the move.
You can also move a segment. To do this, first select the wire. In the center of each movable segment is a diamond shaped symbol. Left click on this symbol and drag the segment to your desired position. Notice that the wire segment size and orientation remains unchanged – the connecting segments change to accommodate your move.
To connect an output node to multiple input nodes, the simplest way is to just add new wires between the output node and each input node.

tip: To auto start new wires from the original starting node hold down the Ctrl key while clicking on each ending node.
If the input nodes are relatively close to together, however, you can make the wire routing much cleaner by creating one wire between two of the nodes, then branching that first wire multiple times to connect to the remaining input nodes.
In Halogen, a wire branch occurs when you split the audio flow from a single wire into two parts. This allows you to improve the appearance of the wiring by creating branches near the destination nodes rather than creating completely separate wires for each connection.
You create a branch in one of two ways:
1) Create a new vertex on an existing wire then double-click on the vertex to start a branch wire at that position. Then click on the destination input node and Halogen connects it to the existing wire. Note: you can start a branch wire at any existing vertex by double-clicking on it:

2) Start at the destination (input) node and click on it to start a new wire. Route the wire as you desire and eventually click on the existing wire at a convenient position. Halogen will connect the new wire to the existing wire creating a new vertex and branch:

After you have created a multi-branch wire, you can select some or all parts of the wire by clicking on it. This allows you to copy, paste, move, or delete the selected portions. You can select various parts of the wire according to where you click. The simple rule is that when you click on a segment, Halogen selects that segment and all segments that lead from it, forward to the destination input nodes.
For example, with a multi-branch wire like this:

Clicking on the left part of the wire selects the entire wire, including all branches:

If you click on one of the branches, however, Halogen selects only that branch:

If you click on a branch that contains other branches, Halogen selects that branch and all of its child branches leading to the set of destination nodes:

Once you have selected all or part of a wire, you can do operations with it:
• To copy the selected items and create a duplicate, do a copy and paste operation (Copy and Paste in the Edit region of the Ribbon Bar (or Ctrl-C, Ctrl-V), or right-click and select Copy/Paste in the context menu.
• To delete the selected items, press the delete key or right click and select the Delete menu item.
• To move the selected items, left-click on the items and drag them to a new position. Note: If you do this with a partially selected wire (i.e., one or more branches), you disconnect the selected items from the rest of the wire:

Connecting wires between blocks one at a time is really fun – for about the first five times! If you have several separate connections to make that are similar to each other, there is a better way.
Halogen allows you to start separate wires from multiple nodes and route them to their destination nodes in one operation.
To route a set of wires, first select the set of starting nodes that you want to wire from. The easiest way to do this is to position the mouse cursor in an empty area of the processing map, then click and drag a selection box around the nodes you wish to select:

Another way to select a set of nodes is to left click on the first node, then hold the Ctrl key and click on any additional nodes you want to select. You can remove nodes from the selected set in the same way, by holding the Ctrl key and clicking on a currently selected node.
note: These selection methods may be used together in any combination
To route the set of wires, start by clicking on any one of the selected nodes and begin moving your mouse in the desired direction. This begins the wiring process:

Route the wires as you desire in the same way as with a single wire: clicking on the blank areas of the processing map to create bends in the path for the set of wires.
To finish off the set and make the connections, first hover your mouse cursor over the destination. Halogen automatically chooses nodes for the connections, depending on what you hover over and the blocks and nodes available near the destination:
1) Hovering over the title bar of a block with multiple nodes connects the wires to as many available nodes as possible on that block. If there are Add nodes, these are skipped; it’s best to Add the number of nodes needed on a block before multi-wiring.

2) Hovering over a specific node in a block connects the wires to as many available nodes as possible across vertically aligned blocks.

By changing where you hover, you can change the destination nodes for the set of wires.
note: Halogen skips blocks that are not vertically aligned within two grid spacings: 
When you have the destinations as you want them, click and Halogen makes the wires as you've placed them.
note: Halogen leaves any wires that did not have destination nodes in a partially constructed state as long as you have created at least one wire segment in the process of routing the set of wires.
To make bends look nicer when routing multiple wires at once, Halogen provides two hotkeys that stagger the wires when routing multi-wires.
1) z or left arrow staggers to the left:

2) x or right arrow staggers to the right:

When you start creating a set of multiple wires, the spacing retains that of the original nodes. To make a cleaner appearance, Halogen provides a hotkey that sets the spacing between wires to one grid distance. To do this start routing a set of wires and then press the s key (for stack):

Sometimes you want to collect a set of wires that you are routing to a single point. One reason might be that you are routing a set of input nodes back to a single output node. (This may seem backwards, but it is the easiest way) To do this, select the set of input nodes and click on the top-most node to start wiring. Route the wire as you desire toward the destination output node. To connect all of the wires in the set to this node, press the c key (for combine) and Halogen makes all of the individual wires line up in the same point. When you click on the destination node, Halogen connects all of the wires to the node:

If you have an existing set of wires and want to connect another set of output nodes to these wires, Halogen can do it!
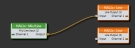
For example, suppose you have this configuration of blocks and wires:

Now suppose you want to connect the same outputs to the lower mixer block. To do this:
1) First select the set of unconnected input nodes on the lower mixer block.
2) Double click on the top-most node in the selected set – Halogen begins creating a new set of wires starting at these nodes.
3) Route the wires toward the existing set of wires that you want to connect to. To do this move your mouse to the left, press the x key to stagger the wires to the right, then click on the processing map to add a vertex to each new wire:

4) Now move your mouse so that it is over the top-most wire in the set that you want to connect to. Note that the end of each new wire changes to a blunt end, indicating that the new connections are valid:

5) Click on the wire and Halogen connects all of the wires to the existing set:

 See Also