Wire Tags allow you to simplify wiring in the Processing Map. The concept of wire tags is similar that of a single channel bus: you can create a Source Wire Tag that receives a single audio channel and then create one or more Destination Wire Tags that let you connect that audio channel to other nodes in your Processing Map. A set of wire tags allows you to connect an audio output node to any set of audio input nodes without needing to wire between these nodes with long or complex wire connections. This is especially useful when the nodes are relatively far apart from each other in the Processing Map.
As introduced above, Halogen includes two types of wire tags: Source and Destination.
Source Wire Tags
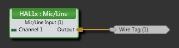
A source wire tag provides an input node for an audio connection that you can use with one or more destination wire tags. The source wire tag also provides the name for the set of source and associated destination wire tags that use the connected audio channel. The source wire tag provides the properties to set the font and background color for all wire tags in the associated set. A set of wire tags for a single audio channel can have only one source wire tag.
- Click the Processing tab to access the Processing Workspace.
- Below the processing palette (to the left of the workspace) is an icon for adding a source wire tag to the processing map. You have two options for adding the source wire tag to the workspace:
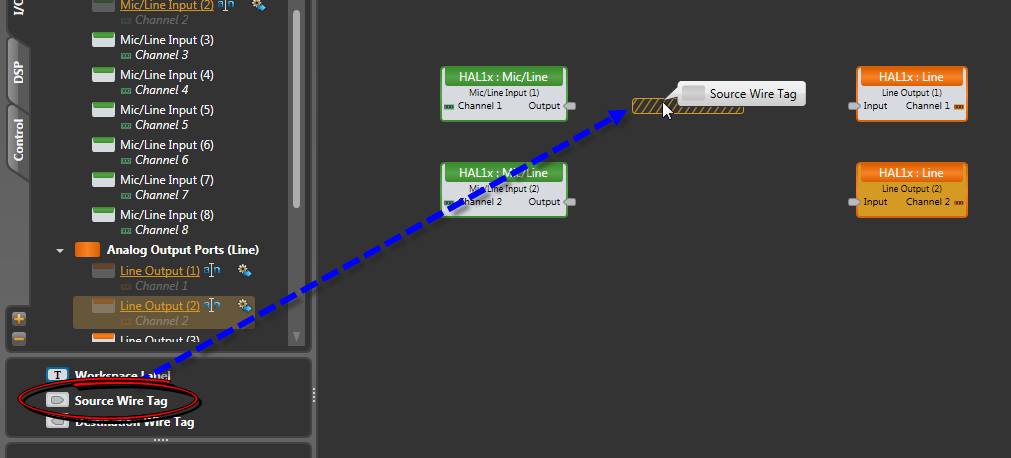
- Click and drag the Source Wire Tag into the Processing Map. (Holding the wire tag at the edges of the workspace auto-scrolls to other areas). Once the hashed drop target is in position release the mouse button to add the wire tag to the workspace:
- Double-click on the Source Wire Tag icon or text to add the wire tag to the right of the currently selected block(s) in the workspace. If nothing is selected, Halogen positions the wire tag in the middle of the visible portion of the processing map.
- Click and drag the Source Wire Tag into the Processing Map. (Holding the wire tag at the edges of the workspace auto-scrolls to other areas). Once the hashed drop target is in position release the mouse button to add the wire tag to the workspace:
- Connect the source wire tag to your configuration by wiring its input node to an existing block's output node:
- To change the name of the source wire tag, click on the existing name, which pops up a name entry box. Enter the new name and press the Enter key or click on the X:

- To change the other settings of the source wire tag, first hover your mouse over a blank area of the wire tag and either double-click on this area or click on the setting icon which appears:

This brings up the source wire tag property dialog:

- You can change the wire tag's name in the Name text box.
- You can change the font and background colors using the drop down control in the Colors area of the property dialog.
note: The name, font color and background color are used for all wire tags in a set. This includes the source wire tag and all destination wire tags that are associated with the source.
To reposition a source wire tag in the processing map, hover over a blank area of the wire tag, click, and drag the wire tag to the new position. There is always a small blank region just after the name on a source wire tag.
Destination Wire Tags
Destination Wire Tags allow you to wire the audio channel connected to a source wire tag to a block input node in the processing map. This type of wire tag provides an output node for the audio connection, a control to duplicate the wire tag, and a drop down control for selecting the source wire tag.
- Click the Processing tab to access the Processing Workspace.
- Below the processing palette (to the left of the workspace) is an icon for adding a destination wire tag to the processing map. You have two options for adding the destination wire tag to the workspace:
- Click and drag the Destination Wire Tag into your Processing Map. (Holding the wire tag at the edges of the workspace auto-scrolls to other areas). Once the hashed drop target is in position release the mouse button to add the wire tag to the workspace.
- Double-click on the workspace Destination Wire Tag icon or text to add the wire tag to the left of the currently selected block(s) in the workspace. If nothing is selected, Halogen positions the wire tag in the middle of the visible portion of the processing map.
- Click and drag the Destination Wire Tag into your Processing Map. (Holding the wire tag at the edges of the workspace auto-scrolls to other areas). Once the hashed drop target is in position release the mouse button to add the wire tag to the workspace.
- Associate the destination wire tag to a source wire tag by hovering your mouse over the destination wire tag, clicking on the drop-down arrow that appears just to the left of the output node, and selecting the name of the desired source wire tag from the list:

- Connect the destination wire tag to your configuration by wiring its output node to an existing block's input node:

note: You can only use wire tags once in a given signal path. This means that you cannot wire an output node of a destination wire tag to the input node of a source wire tag.
Once you have one destination wire tag in your processing map, an easy way to add more of the same type is to click on the + icon that appears when you hover your mouse over the existing wire tag:
Each destination wire tag is associated with a single source wire tag. To change the association, hover your mouse over the destination wire tag then click on the drop-down arrow that appears just to the left of the output node. Select the desired source wire tag from the list: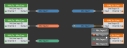
note: After you change a wire tag association, the destination wire tag obtains the same name and color settings as the associated source wire tag.
To reposition a destination wire tag in the processing map, hover over wire tag's name, click, and drag the wire tag to the new position.
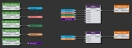
Mixer Example
You can use wire tags to simplify your processing map by reducing the number of wires, especially for connections that are relatively far apart. You can also clarify the wire tag connections by color coding the wire tags so you can easily find them in a complex configuration. The following is an example of what you can do:
 See Also