Event Manager
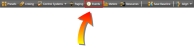
- Click the Processing tab to open the Processing Workspace.
-
On the Processing Workspace Toolbar, click Events:
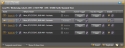
Provides a central location for creating, editing and linking of events. For details on working with Events, see About Events.
| UI Element | Purpose |
|---|---|
| Time |
When disconnected, displays the PC’s time. When connected, displays the HAL’s time. |
| Event |
Displays the list of all previously created event names, in the order created. Configure each event’s details by clicking the yellow, underlined event name. The far left event icon displays the event type:
To the right of the event name is an edit icon. When clicked, an edit box opens where you can rename the event: The event’s link icon looks like this: |
| What's Next? |
Displays the date and time of the next event value/state change: Activate or Deactivate. |
| Value | Displays the current state of the event, active or inactive. |
| Active Trigger |
The Active Trigger button allows manually activating an event. This is useful for testing events, rather than waiting for the next scheduled state change to occur. Linking to the Active Trigger’s chain symbol icon allows activating this event manually without relying on the time of day. This permits events to trigger using both the time and a physical switch, DR remote checkbox (for a toggle event) or an external 3rd-party control or web control button on a web page. |
| Inactive Trigger |
Press the Inactive Trigger button to deactivate an event. Linking to the Inactive Trigger's chain symbol icon allows another action to take place upon completion of the event. This action could be an indicator on a web page or digital remote, or events can be cascaded one to another by linking the Inactive Trigger from one event to the Active trigger of another event. |
| Enable |
When this checkbox is checked, the event is permitted to trigger (either active or inactive) once the time matches the settings of the event. When unchecked, the event is disabled and cannot trigger; neither an active or inactive trigger can occur when disabled. Link to the chain icon next to the event enable check box to enable or disable events manually using other controls such as 3rd-party controls, web pages, DR remotes or physical switches. |
| Suspend event timer | This checkbox conceptually unplugs the clock from all events so no events trigger. Use it to prevent all events from changing state according to their next scheduled state change, which is useful when creating and testing event active and inactive states manually. |
| Show 24-hour time | Check this box to display all event manager times using military time such as 18:00 for 6:00 pm. |
| Add | Click this button to create a new event which is added to the bottom of the list. |
| Duplicate | To make a copy of an existing event, click this button and a duplicate of the event is added to the bottom of the events list. |
| Copy |
If you set up events in previous Halogen configuration files and want to reuse them in new designs, events can be copied via the Windows clipboard from an old configuration file to a new file. To do so: Open the original Halogen file, open the event manager, highlight the event you want to copy to a new file, and click this button. Open the new file, open the event manager and click the Paste event from clipboard button. |
| Paste | Click this button to add a previously-copied event from the Windows clipboard to the event manager, or to update the settings of an existing and selected event with the event settings on the clipboard. |
| Adjust HAL Date/Time | Only available when connected to a live HAL device, use this dialog to configure all aspects of the HAL’s internal clock. |
 - Toggle event
 - Command event
 - Selector event (always a 2-position selector)
 Drag and drop this icon to
  See Also