Page Layout Workspace
- Click the Processing tab to open the Processing Workspace.
- On the Processing Workspace Toolbar, click the Control Systems drop down menu then select Web Controls. In the Web Controls window that opens, the Page Layout Workspace appears on the right side of the window:

Provides a workspace to add, position, and resize control page elements including controls, images, layout elements and page links. The page layout workspace represents a single control page in the configuration and though it is not interactive (i.e. the controls and page links do not operate), it gives an accurate visual representation of the control page as it will be in operation.
note: You can view and operate interactive control pages in a web browser or the DR6 Viewer dialog, available via the Preview Page toolbar feature.
The contents of the page layout workspace correspond to the currently selected control page, as indicated by the white highlighted area in the Pages portion of the palette. When you select another control page by clicking on another item in the Pages palette or page selection drop-down menu in the toolbar, the page layout changes to show the content of the newly selected page.
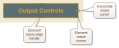
An example of page items placed in the page layout workspace is as follows:

In this example there are three page elements on the page: a Workspace Label (Output Controls), a Selector control (Program Source), and a Level control (Volume). The following table shows operations that you can do with page elements in the page layout workspace using the three elements shown above:
| Workspace Operation | Procedure |
|---|---|
| Move a page element |
To move a single workspace element to a new position in workspace:
note: The Layout Workspace uses an eight pixel grid and normally positions element edges on grid boundaries. If you would like to move an element off-grid, press the Alt key when dragging with your mouse, which allows positioning to any location on the workspace. |
|
Move multiple elements
|
To move multiple workspace elements to new positions, maintaining relative spacing between elements:
note: The Layout Workspace uses an eight pixel grid and normally positions element edges on grid boundaries. If you like to move an element off-grid, press the Alt key when dragging with your mouse, which allows positioning to any location on the workspace. |
| Resize an element |
You can resize most of the page elements in both the horizontal and vertical directions. To resize a single page element do the following:
note: You can set element X/Y/W/H via the element's property dialog too. note: If a resize handle does not appear on an edge of a selected element, then you cannot resize the element in that direction. note: The Layout Workspace uses an eight pixel grid and normally positions element edges on grid boundaries. If you like to resize an element off-grid, press the Alt key when dragging with your mouse, which allows resizing an edge to any location on the workspace. |
| Resize multiple elements |
To resize multiple elements at the same time do the following:
note: All selected elements must be able to resize in the same direction for the resize handles to appear. For example, selecting a Selector control and its label does not allow the height resizing handles to appear because a Selector control's height is not resizable: |
| View page properties |
The control page has a set of properties that you can view and modify. These are shown in the common Page/Page Element property dialog when you have unselected all elements in the workspace. To view the properties for the control page:
For details about the available page properties, see Control Page Property Dialog Box. note: If the common Page/Page Element property dialog is already visible, it will switch to displaying the page properties when you unselect all elements on the page or when you select more than one element. note: The Layout Workspace uses an eight pixel grid and normally positions element edges on grid boundaries. If you like to resize an element off-grid, press the Alt key when dragging with your mouse, which allows resizing edges to any location on the workspace. |
| View an element's properties |
Every page element has a set of properties that you can view and modify. Halogen displays these in a common Page/Page Element property dialog which changes according to what you've selected on the control page. To view an elements properties do one of the following:
For more details about the properties for all of the various control page elements, see Page/Page Element Property Dialogs note: As you select different elements in the page layout workspace, the common page/page element property dialog changes to display the properties for the currently selected element. note: If you have more than one element selected on the page, the Page/Page Element Properties dialog displays the properties for the Page. That is, to view the properties for a Page Element, it must be the only element selected on the page. |
|
Delete one or more elements from the page |
To delete one or multiple elements from the page layout workspace:
|


You can also perform copy/paste and alignment operations on page element in the workspace using controls in the Workspace Controls area just below the workspace. For details see Workspace Controls.
 See Also