Meters
- Click on the Processing tab to open the Processing Workspace.
- On the Processing Workspace Toolbar, click Meters.

Provides a central location for displaying custom sets of meters from multiple property dialogs. The meters that appear in the Meters dialog are ‘copies’ of meters that are part of other block property dialogs. The Meters dialog provides a handy way to create groups of meters that can be visible without opening all of the individual property dialogs to view the meters.
| UI Element | Purpose |
|---|---|
| Meter |
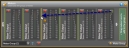
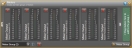
When connected to a HAL, the meter displays the rms, instantaneous peak, and peak-hold values of the signal. The meter also shows the type of meter, (e.g. ‘Mixer Output’) and the name of the block that it is a part of (e.g. ‘Room Processor A (1)’). Delete the meter from the group by clicking on the X in the upper left corner. Move the meter to another position in the group by hovering your mouse over a meter and dragging the green meter icon to a new position in the window. When you have clicked on the green icon, green drop areas appear in the window.
When a meter is disabled, which occurs when Halogen is not connected to a HAL or when a meter is from an inactive Room Processor, the meter scale appears in gray and the meter background is pale. When more than sixteen meters are enabled in the Halogen application, only the most recent sixteen will be active. When a meter is not active, the meter scale remains white but the meter data freezes and becomes slightly grayed out. Bringing the Meters window into focus or changing to a new meter group reactivates all meters in the current group, bringing them to the top of the active meter list. See Meter block reference section for more information about meters. |
| Green Meter Drop Area |
Add a meter to the current meter group by dragging a green meter icon from a meter in a block’s property dialog and dropping on the green box on the far right of the meter group. If this is not visible in the window, you can either make the window wider by dragging either side of the window border or by scrolling the meters. Each meter group has a maximum of 8 meters.
|
| Meter Group controls |
Select the currently visible meter group by clicking on the arrow to the right of the meter group name and selecting the group that you want to view. Rename the current meter group by clicking on the edit text icon next to the meter group selection box and typing in the edit box that appears. Add a new meter group by clicking on the + Meter Group button in the lower right of the Meters dialog. The new group becomes the current meter group. Delete the current meter group by clicking in the X icon adjacent to the meter rename icon. |