User Interface Reference
Digital Remote (DR) Properties Dialog Box
- After adding a DR to the Hardware Map, double-click the DR or hover over it and click the properties icon that appears:
Configure properties specific to this DR device (customizing a name for the device and, if relevant, configuring the Backlight Settings for its LCD screen.
Below is an image of the properties dialog box shared by the DR1, DR2, and DR3. The table below lists all the DR properties you may encounter and provides a definition of each.

note: When connected to a HAL, the properties also include a status bar below the DR name as well as a Locate button.
| UI Element | Purpose |
|---|---|
| Title Bar Name | Area at the top of the properties dialog box that displays the DR's Device Name as well as the HAL/EXP device model, the HAL/EXP port to which the DR is connected, and the DR model: 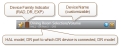 |
| Device Name |
A customizable name for identification purposes when working within Halogen. This name does not appear on the DR itself. Edit the name in the text field provided. note: You can also edit the DR's name by clicking the name in the port bar above the DR in the Hardware Map and typing a custom name in the edit box that appears. |
| Backlight Settings |
DRs have a backlight that lights up the display on the device. These settings determine how the backlight functions. The Minimum and Maximum settings determine the backlight's light intensity—on a scale from 0 (Off) to 10 (High). When the DR first powers on or is adjusted by an end user, its backlight goes to the Maximum light intensity. After the specified Timeout period has passed, the backlight returns to the Minimum light intensity. Timeout is measured in seconds, from 0 to 1000000. Its default value is 15 seconds. |
| Serial Number | When connected, the serial number of the connected DR is displayed. |
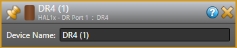
Below is an image of the property dialog box for the DR4 and DR5. The table below lists all the DR properties and provides a definition of each.
note: When connected to a HAL, the properties also include a status bar below the DR name as well as a Locate button.
| UI Element | Purpose |
|---|---|
| Title Bar Name | Area at the top of the properties dialog box that displays the DR's Device Name as well as the HAL/EXP device model, the HAL/EXP port to which the DR is connected, and the DR model:  |
| Device Name |
A customizable name for identification purposes when working within Halogen. This name does not appear on the DR itself. Edit the name in the text field provided. note: You can also edit the DR's name by clicking the name in the port bar above the DR in the Hardware Map and typing a custom name in the edit box that appears. |
| Serial Number | When connected, the serial number of the connected DR is displayed. |
Below is an image of the property dialog box for the DR6. The table below lists all the DR properties and provides a definition of each.

note: When connected to a HAL, the properties also include a status bar below the DR name as well as a Locate button.
| UI Element | Purpose |
|---|---|
| Title Bar Name | Area at the top of the properties dialog box that displays the DR's Device Name as well as the HAL/EXP device model, the HAL/EXP port to which the DR is connected, and the DR model:  |
| Device Name |
A customizable name for identification purposes when working within Halogen. This name does not appear on the DR itself. Edit the name in the text field provided. note: You can also edit the DR's name by clicking the name in the port bar above the DR in the Hardware Map and typing a custom name in the edit box that appears. |
| Backlight Settings |
The DR6 has a backlight that lights up the display on the device. These settings determine how the backlight functions. The Minimum and Maximum settings determine the backlight's light intensity—on a scale from 0 (Off) to 10 (High). When the DR first powers on or is adjusted by an end user, its backlight goes to the Maximum light intensity. After the specified Timeout period has passed, the backlight returns to the Minimum light intensity. Timeout is measured in seconds, from 0 to 1000000. Its default value is 60 seconds. |
| Ambient Sensitivity Settings |
Adjust how sensitive the DR6 device is to changes in ambient light. Options are Off, Low, Medium and High. The DR6 contains a light sensor that causes the backlight to dim when the light in the room darkens when the sensitivity setting is Low, Medium, or High, where High causes the most change to the backlight intensity when the room dims. |
| Serial Number | When connected, the serial number of the connected DR6 is displayed. |
 See Also