Selectors
This section explains how to integrate HAL selector controls with buttons on an AMX touch panel by examining a couple of touch panel applications: input source selector radio buttons and preset selector radio buttons. We start by dissecting the code for the HAL selector controls and radio buttons. Then we demonstrate how to bind the HAL selector controls to radio buttons in the touch panel user interface.
At its simplest, a HAL selector control is just a selection integer value. The range of this selection value is constrained by the number of positions on the selector. For instance a HAL three-way selector can only have a value of 0, 1 or 2. Lets look at one way to code a fixed selector.
Open the Main.axs source file in NetLinx Studio. Find the DEFINE_CONSTANT section of the program. It contains some constants for a three-way source selector implemented as three radio buttons:
BTN_CLASSICAL = 10
BTN_JAZZ = 11
BTN_REGGAE = 12
…
nSourceSelNumber = 1
INTEGER nSourceSelChannels[] = { BTN_CLASSICAL, BTN_JAZZ, BTN_REGGAE }
10, 11 and 12 are the device Channel Codes of the source selector’s three touch panel radio buttons. 1 is the unique control number of this source selector on the HAL. Unlike the preceding toggle, command and level code, the selector’s device Channel Codes do not double as HAL control numbers. This is because there is not a one-to-one relationship between radio buttons and a selector controls.
The three-way tone selector has similar constants. BTN_SOFTEN_VOCALS, BTN_SMOOTH and BTN_BOOST_BASS are the device channel numbers of the tone selector’s three radio buttons. 2 is the tone selector’s unique control number on the HAL.
Find the DEFINE_VARIABLE section of the program. It contains some source-selector-related variables:
nSourceSelValue
bSourceSelRadios[max_length_array(nSourceSelChannels)]
The selection value of the source selector is kept in nSourceSelValue. The on/off states of the source selector’s three radio buttons are maintained in bSourceSelRadios array. We’ll see shortly that the source selector in this example is modeled as a collection of mutually exclusive toggles.
The source selector has a dedicated event handler for its touch panel radio buttons. You will need to customize it for your own fixed selectors:
BUTTON_EVENT[dvTP, nSourceSelChannels]
{
  PUSH:
  {
    nChannelIndex = GET_LAST(nSourceSelChannels)

    if (nChannelIndex > 0 &&
        nChannelIndex <= length_array(nSourceSelChannels))
    {
      nSourceSelValue = nChannelIndex - 1

      UpdateSourceSelectorRadios(
        nSourceSelChannels[nChannelIndex])

      Send_String dvHAL, "'<S&',
                  itoa(nSourceSelNumber), '&',
                  itoa(nSourceSelValue), '>'"
    }
  }
}
The device Channel Codes for the selector’s three radio buttons are passed in through the nSourceSelChannels argument. The handler knows which radio button on the touch panel fired the event because the GET_LAST call returns the index of that button in the nSourceSelChannels array. It then subtracts 1 from that index to get the new selection value. A call to UpdateSourceSelectorRadios ensures the other radio buttons on the touch panel are toggled off.
Likewise, the tone selector has its own dedicated event handler and UpdateToneSelectorRadios function. The selection value of the tone selector is kept in nToneSelValue. The on/off states of the tone selector’s three radio buttons are maintained in the bToneSelRadios array.
Whenever a touch panel radio button is pressed, the corresponding selector’s event handler sends a message string with a new selection value to the HAL. These ‘set selector’ messages contain a selector control type, HAL control number and value. The valid ‘set selector’ messages for the source selector in this program are <S&1&0>, <S&1&1> and <S&1&2>. The valid ‘set selector’ messages for the tone selector in this program are <S&2&0>, <S&2&1> and <S&2&2>
The HAL sends these same ‘set selector’ messages to the controller whenever another client changes the selection value. Here is the STRING event handler code in the client to parse incoming selection values for both selectors:
active(find_string(cData, '<S&', 1)):
{
  remove_string(cData, '<S&', 1)

  nSelectorNumber = atoi(cData)

  remove_string(cData, '&', 1)

  if (nSelectorNumber == nSourceSelNumber)
  {
    nSourceSelValue = atoi(cData)

    UpdateSourceSelectorRadios(
      nSourceSelChannels[nSourceSelValue + 1])
  }
  else if (nSelectorNumber == nToneSelNumber)
  {
    nToneSelValue = atoi(cData)

    UpdateToneSelectorRadios(
      nToneSelChannels[nToneSelValue + 1])
  }

  remove_string(cData, '>', 1)
}
The Mainline contains feedback statements for the selectors’ radio buttons. These feedback statements update the visible state of the selectors’ radio buttons on the touch panel in response to selection value changes triggered by button presses from the touch panel or messages from the HAL:
for (nChannelIndex = 1;
     nChannelIndex <= length_array(nSourceSelChannels);
     nChannelIndex++)
{
  [dvTP, nSourceSelChannels[nChannelIndex]] =
           bSourceSelRadios[nChannelIndex]
}

for (nChannelIndex = 1;
     nChannelIndex <= length_array(nToneSelChannels);
     nChannelIndex++)
{
  [dvTP, nToneSelChannels[nChannelIndex]] =
           bToneSelRadios[nChannelIndex]
}
The controller requests HAL selector control values from the HAL upon connecting. This ensures that the radio buttons on the touch panel are in sync with the live selector values on the HAL. It does this by sending ‘get selector’ messages to Halogen/HAL when the ONLINE event is fired. These ‘get selector’ messages consist of a selector control type and HAL control number. See the source selector’s ‘get selector’ message in the client’s ONLINE event handler.
Send_String dvHAL, "'<S&', itoa(nSourceSelNumber), '>'"

Send_String dvHAL, "'<S&', itoa(nToneSelNumber), '>'"
The valid ‘get selector’ message string for the two selectors in this example are <S&1> and <S&2>. The HAL responds to these ‘get selector’ messages with corresponding ‘set selector’ messages.
note: Refer to Appendix A External Control Message Protocol for more information on selector messages.
Source Selector
This example demonstrates how to get radio buttons on a touch panel to switch between input source selections on a HAL. The example Halogen configuration file contains a selector block wired to three HAL Mic/Line Inputs. The input nodes on the selector block are named Classical, Jazz and Reggae for the genre of music being fed into each of them. This selector block is linked to a HAL Control Systems selector control named Source Selector Control. Switching selections on the Source Selector Control switches the selected input on the selector block.
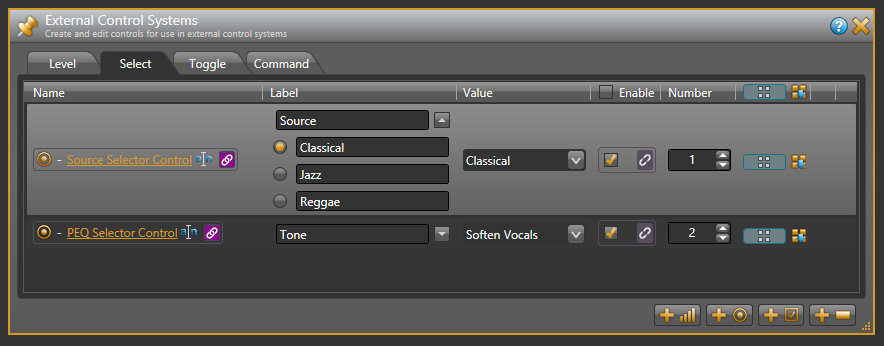
Open the ControlSystemSample.hal example configuration file in Halogen. Switch to the Processing workspace by clicking on the Processing tab. Next, open the External Control Systems dialog and select the Selector tab. Notice that the Source Selector Control is assigned a HAL control number of 1. There is no direct one-to-one relationship between this selector’s unique HAL control number and any device Channel Codes on the touch panel. That’s because the Source Selector Control has three touch panel buttons associated with it. The device channels of these radio buttons are 10, 11 and 12.
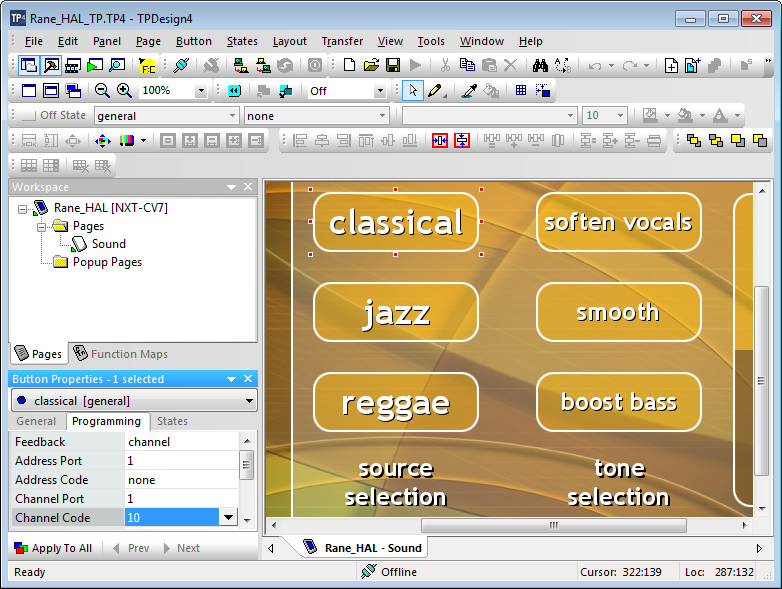
Open the Rane_HAL_TP.tp4 design file in TPDesign. Next, open the Sound page window to view the example touch panel design. Select the Classical button in the Sound page window then select the Programming tab in Button Properties. Notice that the Channel Code of this button is set to 10 and the Feedback is set to channel for latching so that it behaves like a toggle. Verify that the Channel Codes of the Jazz and Reggae buttons are 11 and 12 respectively.
Verify that the Connected status indicator in the upper right corner of the touch panel says Connected. Refer to the Troubleshooting section if it the status indicator says Disconnected. Double-click the Selector (1) block in the Processing map to bring up the Selector Block (1) properties dialog. Click the Jazz radio button in the Selector Block (1) dialog. Then press the Classical button on the touch panel. The source selection in Halogen switches from Jazz to Classical. Now click the Reggae radio button in Halogen. The Classical radio button is deselected and the Reggae radio button is selected on the touch panel.
note: Refer to Appendix B Using PuTTY to Test External Control Systems for help with debugging if the system does not behave as described here.
Preset Selector
This example demonstrates how to get radio buttons on a touch panel to switch between presets on a HAL. The example Halogen configuration file contains a Parametric EQ block. Different EQ filter settings for this block are saved to different presets. One preset softens vocals, another smooths out the mid-range and a third boosts the bass. These three presets belong to the same PEQ Preset Selector. This preset selector is linked to a HAL Control Systems selector control named PEQ Selector Control. Switching selections on the PEQ Selector Control switches the active preset in the PEQ Preset Selector.

Open the ControlSystemSample.hal example configuration file in Halogen. Next, open the External Control Systems dialog and select the Selector tab. Notice that the PEQ Selector Control is assigned a HAL control number of 2. There is no direct one-to-one relationship between this selector’s unique HAL control number and any device channels on the touch panel. That’s because the PEQ Selector Control has three touch panel buttons associated with it. The device Channel Codes of these radio buttons are 20, 21 and 22.

Open the Rane_HAL_TP.tp4 design file in TPDesign. Next open the Sound page window to view the example touch panel design. Select the Soften Vocals button in the Sound page window then select the Programming tab in Button Properties. Notice that the Channel Code of this button is set to 20 and the Feedback is set to channel for latching so that it behaves like a toggle. Verify that the Channel Codes of the Smooth and Boost Bass buttons are 21 and 22 respectively.
Verify that the Connected status indicator in the upper right corner of the touch panel says Connected. Refer to the Troubleshooting section if it the status indicator says Disconnected. Click the Presets icon in the Processing toolbar to bring up the All Presets dialog. Choose the Selector tab in that dialog and expand the PEQ Preset Selector so that its contents are visible. Click the Smooth radio button in the All Presets dialog. Then click on the Soften Vocals radio button on the touch panel. The selected PEQ preset in Halogen switches from Smooth to Soften Vocals. Now click on the Boost Bass radio button in Halogen. The Boost Bass radio button is selected and the Soften Vocals radio button is deselected on the touch panel.
note: Refer to Appendix B Using PuTTY to Test External Control Systems for help with debugging if the system does not behave as described here.