Levels
This section explains how to integrate HAL level controls with sliders on an AMX touch panel by examining a volume slider on a touch panel. We start by dissecting the code for the HAL level control and touch panel slider. Then we demonstrate how to bind the HAL level control to the slider on the touch panel user interface.
The HAL level controls that are accessible to a controller have a value range of 0 to 1000. Compare that with the 0 to 255 range of a level control in AMX. This discrepancy requires that an AMX controller convert the level values that it gets from and sends to Halogen/HAL. HAL levels map naturally to “active” bar graphs on AMX touch panels. These touch-sensitive bar graphs act as sliders so this guide refers to them as such. The example program provides code for handling level events and parsing level strings from Halogen/HAL. Let’s take a look at it.
Open the Main.axs source file in NetLinx Studio. Find the DEFINE_CONSTANT section of the program. It contains some level-related constants:
LVL_LOUNGE_VOLUME = 6
…
INTEGER nLevelChannels[] = { LVL_LOUNGE_VOLUME }
This code says that there is one HAL level control in this program and that its touch panel device Level Code is 6. The 6 is also a unique control number on the HAL. These control numbers appear in the External Control Systems dialog of the Halogen software. Matching device channel numbers with control numbers makes programming multiple HAL level controls easier.
The example level code is reusable across applications. If you want more sliders on your touch panel just add more device channel numbers to the nLevelChannels array. Coding a new level application is simply a matter of matching HAL level control numbers in Halogen with newly-added slider device Level Codes in AMX.
There is one level event handler for all of the sliders on the touch panel. Feel free to copy and paste this event handler into your own programs:
LEVEL_EVENT[dvTP, nLevelChannels]
{
  nLevelIndex = GET_LAST(nLevelChannels)

  if (nLevelIndex > 0 &&
      nLevelIndex <= length_array(nLevelChannels))
  {
    if (LEVEL.VALUE <> nLevelValues[nLevelIndex])
    {
      nLevelValues[nLevelIndex] = LEVEL.VALUE

      Send_String dvHAL, "'<L&',
                  itoa(nLevelChannels[nLevelIndex]), '&',
                  itoa(nLevelValues[nLevelIndex] * 1000/255),
                  '>'"
    }
  }
}
When a slider on a touch panel is dragged the level event handler sends a message string with a new level value to the HAL. These ‘set level’ messages contain a level control type, HAL control number and level value. Notice the 1000/255 multiplier for the conversion from AMX to HAL level values. Valid ‘set level’ messages for the HAL level control in this example program would be <L&6&0>, <L&6&1>, <L&6&2> all the way to <L&6&1000>.
The HAL sends these same set level strings to the controller whenever another client changes a HAL level control value. Here is the STRING event handler code to parse the incoming level values:
active(find_string(cData, '<L&', 1)):
{
  remove_string(cData, '<L&', 1)

  nLevelIndex = FindLevelIndex(atoi(cData))

  remove_string(cData, '&', 1)

  if (nLevelIndex > 0 &&
      nLevelIndex <= length_array(nLevelChannels))
  {
    nLevelValues[nLevelIndex] = atoi(cData) * 255/1000

    send_level dvTP, nLevelChannels[nLevelIndex],
               nLevelValues[nLevelIndex]
  }

  remove_string(cData, '>', 1)
}
Notice the 255/1000 multiplier for the conversion from HAL to AMX level values. A send_level call updates the slider on the touch panel to the new level that came from the HAL. Unlike toggles and selectors, there are no feedback statements for levels in the Mainline.
The controller requests HAL level control values from the HAL upon connecting. This ensures that the sliders on the touch panel are in sync with the live level value on the HAL. It does this by sending ‘get level’ messages to the HAL when the ONLINE event is fired. These ‘get level’ messages consist of a level control type and HAL control number. See the levels for loop in the client’s ONLINE event handler for how to encode and send them:
for (i = 1;
     i <= length_array(nLevelChannels);
     i++)
{
  Send_String dvHAL, "'<L&',
              itoa(nLevelChannels[i]), '>'"
}
The ‘get level’ message for the level in this example is <L&6>. Upon receipt of this ‘get level’ message the HAL responds with a ‘set level’ message for that HAL level control.
note: Refer to Appendix A External Control Message Protocol for more information on level messages.
Sliders
This example demonstrates how to get a slider on a touch panel to manipulate the level on a HAL output. The example Halogen configuration contains a HAL line output wired to a lounge. The remaining HAL line outputs go to rooms A and B. The level on the lounge output is linked to a HAL Control Systems level control named Lounge Level Control. Adjusting the HAL level control alters the level.
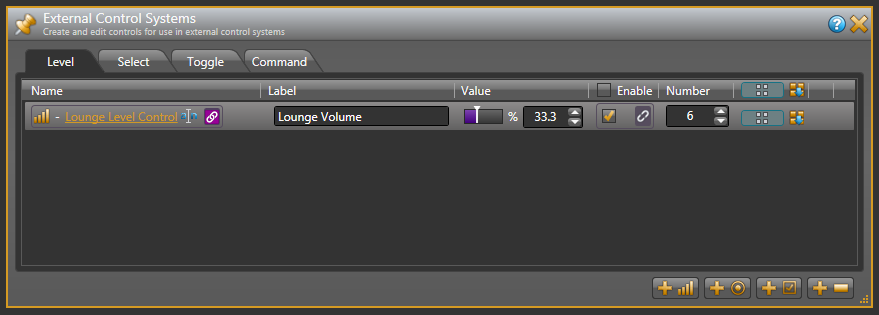
Open the ControlSystemSample.hal example configuration file in Halogen. Next, open the External Control Systems dialog and select the Level tab. Notice that the Lounge Level Control is assigned a HAL control number of 6. For this application to work, the Lounge Level Control number needs to match device Level Code of the Lounge slider on the touch panel.
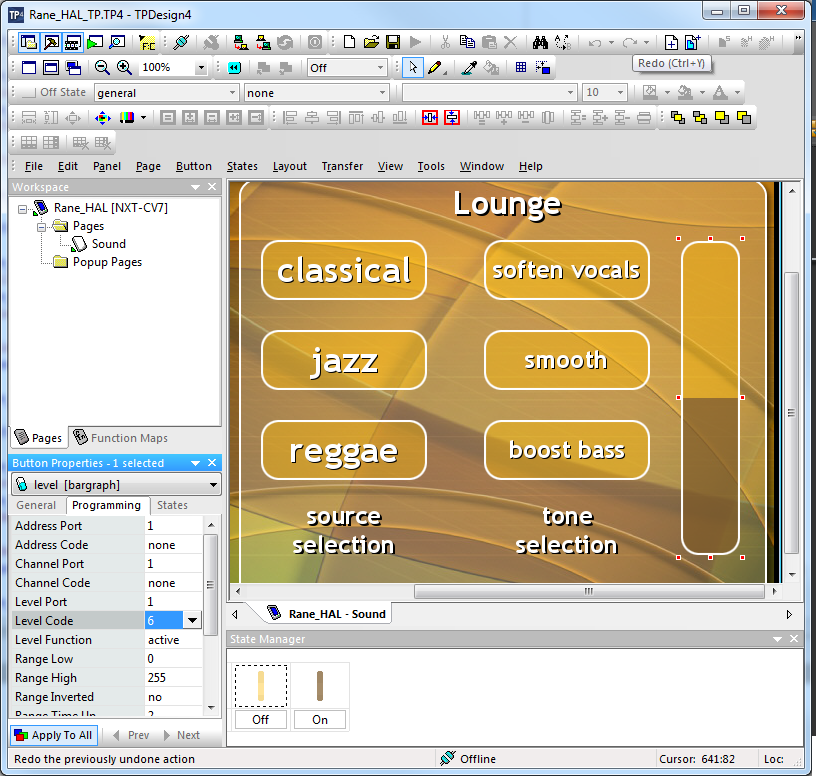
Open the Rane_HAL_TP.tp4 design file in TPDesign. Next open the Sound page window to view the example touch panel design. Select the Lounge bar graph near the right edge of the Sound page window, then select the Programming tab in Level Properties. Notice that the Level Code is set to 6 just like the HAL control number and the Level Function is set to active so that the bar graph acts as a slider.
Verify that the Connected status indicator in the upper right corner of the touch panel says Connected. Refer to the Troubleshooting section if it the status indicator says Disconnected. Double-click the HAL Line Output (1) block in the Halogen Processing map to bring up its properties dialog. Press on the Lounge bar graph on the touch panel and slide your finger up and down to adjust the level continuously. The gain for the HAL Line Output (1) in Halogen follows your finger movement. Now drag the slider for the level on HAL Line Output (1) back and forth in Halogen. The bar graph on the touch panel rises and falls in tandem with the level.
note: Refer to Appendix B Using PuTTY to Test External Control Systems for help with debugging if the system does not behave as described here.