Commands
This section explains how to integrate a HAL command control with a button on an AMX touch panel by examining a simple application: a touch panel button that asserts a HAL preset. We start by dissecting the code for the HAL command control and touch panel command button. Then we demonstrate how to bind the HAL command control to a button in the touch panel user interface.
Command controls are stateless in a HAL system. Unlike toggles they have no on or off values. Command controls are merely triggers for predefined actions like asserting presets. Think of them as "Fire and forget." Because they are stateless the Feedback property for a command button on a touch panel must be set to momentary or blink. The example program provides code for handling command button events from a touch panel. Let’s take a look at it.
Open the Main.axs source file in NetLinx Studio. Find the DEFINE_CONSTANT section of the program. It contains some command-related constants:
BTN_DEFAULT_LEVEL = 3
…
INTEGER nCommandChannels[] = { BTN_DEFAULT_LEVEL }
This code says that there is one HAL command control in this program and that its touch panel device Channel Code is 3. The 3 is also a unique control number on the HAL. These control numbers appear in the External Control Systems dialog of the Halogen software. Matching device Channel Codes with HAL control numbers makes programming multiple HAL command controls easier.
The example command code is reusable across applications. If you want more command buttons on your touch panel just add more device channel numbers to the nCommandChannels array. Coding a new command application is simply a matter of matching HAL command control numbers in Halogen with newly-added button device channel numbers in AMX.
There is one button event handler for all of the command buttons on the touch panel. Feel free to copy and paste this event handler into your own programs:
BUTTON_EVENT[dvTP, nCommandChannels]
{
  PUSH:
  {
    nCommandIndex = GET_LAST(nCommandChannels)

    if (nCommandIndex > 0 &&
        nCommandIndex <= length_array(nCommandChannels))
    {
      Send_String dvHAL, "'<C&',
                  itoa(nCommandChannels[nCommandIndex]), '>'"
    }
  }
}
Whenever a command button is pressed on the touch panel this handler sends a message string to the HAL. These ‘command’ messages contain a command control type and a HAL control number. The only valid ‘command’ message for the command in this example would be <C&3>.
note: Refer to Appendix A External Control Message Protocol for more information on command messages.
When a client sends a ‘command’ message the HAL echoes it back to all its other clients. The controller currently ignores unsolicited command messages but you can add code to parse them if you want your touch panel to exhibit feedback when they arrive. See the STRING section of the TCP/IP client’s DATA_EVENT handler for parsing techniques.
Command Presets
This example demonstrates how to get a button on a touch panel to trigger a command preset on a HAL. The example Halogen configuration contains a command preset that sets the levels of all the HAL line outputs to a default level of -40.0 dB and un-mutes them. A preset like this is handy when a user wants to revert undesired audio settings back to their original defaults. The preset is linked to a HAL Control Systems command control named Default Command Control. Invoking this HAL command control asserts the preset.
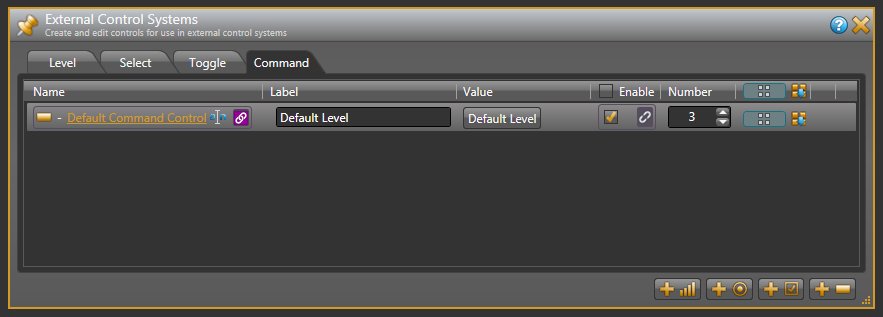
Open the ControlSystemSample.hal example configuration file in Halogen. Next, open the External Control Systems dialog and select the Command tab. Notice that the Default Command Control is assigned a control number of 3. For this application to work, the Default Command Control number needs to match the device Channel Code of the Default Level button on the touch panel.
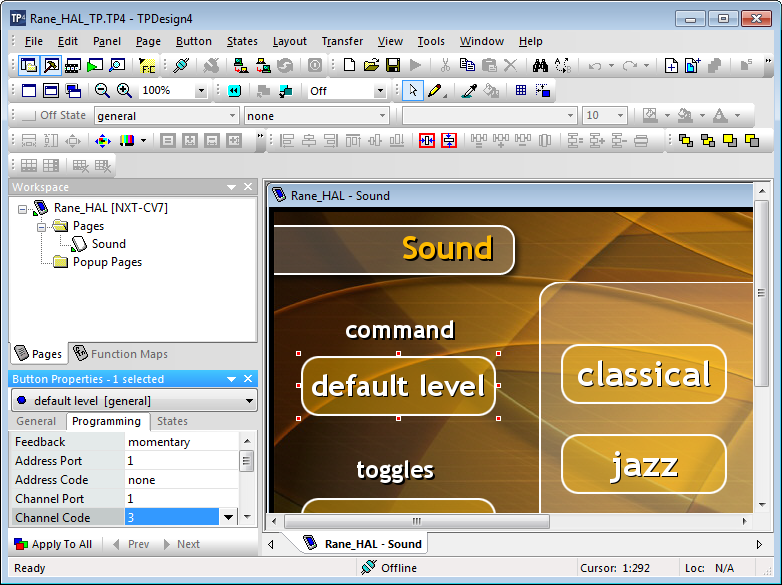
Open the Rane_HAL_TP.tp4 design file in TPDesign. Next open the Sound page window to view the example touch panel design. Select the Default Level button in the Sound page window then select the Programming tab in Button Properties. Notice that the Channel Code is set to 3 just like the control number in Halogen and that Feedback is set to momentary so that the touch panel button behaves like a trigger.
Verify that the Connected status indicator in the upper right corner of the touch panel says Connected. Refer to the Troubleshooting section if it the status indicator says Disconnected. Drag the Lounge slider on the touch panel up to about 90%. Now press the Default Level button on the touch panel. The Lounge slider jumps to 50%. Adjust the Lounge slider down to about 10% then assert the Default Level Preset from Halogen. The Lounge slider on the touch panel jumps back to the center again.
note: Refer to Appendix B Using PuTTY to Test External Control Systems for help with debugging if the system does not behave as described here.