Knowledge Base
Signal Processing Fundamentals
Signal Processing Fundamentals
Dennis Bohn, Rane Corporation
RaneNote 134 written 1997; last revised 5/04
- Loudness
- Crossovers
- Equalizers
- Dynamic Controllers
Screaming To Be Heard
In space, no one can hear you scream ... because there is no air or other medium for sound to travel. Sound needs a medium; an intervening substance through which it can travel from point to point; it must be carried on something. That something can be solid, liquid or gas. They can hear you scream underwater ... briefly. Water is a medium. Air is a medium. Nightclub walls are a medium. Sound travels in air by rapidly changing the air pressure relative to its normal value (atmospheric pressure). Sound is a disturbance in the surrounding medium. A vibration that spreads out from the source, creating a series of expanding shells of high pressure and low pressure ... high pressure ... low pressure ... high pressure ... low pressure. Moving ever outward these cycles of alternating pressure zones travel until finally dissipating, or reflecting off surfaces (nightclub walls), or passing through boundaries, or getting absorbed -- usually a combination of all three. Left unobstructed, sound travels outward, but not forever. The air (or other medium) robs some of the sound's power as it passes. The price of passage: the medium absorbs its energy. This power loss is experienced as a reduction in how loud it is (the term loudness is used to describe how loud it is from moment to moment) as the signal travels away from its source. The loudness of the signal is reduced by one-fourth for each doubling of distance from the source. This means that it is 6 dB less loud as you double your distance from it. [This is known as the inverse square law since the decrease is inversely proportional to the square of the distance traveled; for example, 2 times the distance equals a 1/4 decrease in loudness, and so on.]
How do we create sound, and how do we capture sound? We do this using opposite sides of the same electromagnetic coin. Electricity and magnetism are kinfolk: If you pass a coil of wire through a magnetic field, electricity is generated within the coil. Turn the coin over and flip it again: If you pass electricity through a coil of wire, a magnetic field is generated. Move the magnet, get a voltage; apply a voltage, create a magnet ... this is the essence of all electromechanical objects.
Microphones and loudspeakers are electromechanical objects. At their hearts there is a coil of wire (the voice coil) and a magnet (the magnet). Speaking causes sound vibrations to travel outward from your mouth. Speaking into a moving-coil (aka dynamic) microphone causes the voice coil to move within a magnetic field. This causes a voltage to be developed and a current to flow proportional to the sound -- sound has been captured. At the other end of the chain, a voltage is applied to the loudspeaker voice coil causing a current to flow which produces a magnetic field that makes the cone move proportional to the audio signal applied -- sound has been created. The microphone translates sound into an electrical signal, and the loudspeaker translates an electrical signal into sound. One capturing, the other creating. Everything in-between is just details. And in case you're wondering: yes; turned around, a microphone can be a loudspeaker (that makes teeny tiny sounds), and a loudspeaker can be a microphone (if you SHOUT REALLY LOUD).
Crossovers: Simple Division
Loudspeaker crossovers are a necessary evil. A different universe, a different set of physics and maybe we could have what we want: one loudspeaker that does it all. One speaker that reproduces all audio frequencies equally well, with no distortion, at loudness levels adequate for whatever venue we play. Well, we live here, and our system of physics does not allow such extravagance. The hard truth is, no one loudspeaker can do it all. We need at least two -- more if we can afford them. Woofers and tweeters. A big woofer for the lows and a little tweeter for the highs. This is known as a 2-way system. (Check the accompanying diagrams for the following discussions.) But with two speakers, the correct frequencies must be routed (or crossed over) to each loudspeaker.
Passive
At the simplest level a crossover is a passive network. A passive network is one not needing a power supply to operate -- if it has a line cord, or runs off batteries, then it is not a passive circuit. The simplest passive crossover network consists of only two components: a capacitor connecting to the high frequency driver and an inductor (aka a coil) connecting to the low frequency driver. A capacitor is an electronic component that passes high frequencies (the passband) and blocks low frequencies (the stopband); an inductor does just the opposite: it passes low frequencies and blocks high frequencies. But as the frequency changes, neither component reacts suddenly. They do it gradually; they slowly start to pass (or stop passing) their respective frequencies. The rate at which this occurs is called the crossover slope. It is measured in dB per octave, or shortened to dB/octave. The slope increases or decreases so many dB/octave. At the simplest level, each component gives you a 6 dB/octave slope (a physical fact of our universe). Again, at the simplest level, adding more components increases the slope in 6 dB increments, creating slopes of 12 dB/oct, 18 dB/oct, 24 dB/oct, and so on. The number of components, or 6 dB slope increments, is called the crossover order. Therefore, a 4th-order crossover has (at least) four components, and produces steep slopes of 24 dB/octave. The steeper the better for most drivers, since speakers only perform well for a certain band of frequencies; beyond that they misbehave, sometimes badly. Steep slopes prevent these frequencies from getting to the driver.
You can combine capacitors and inductors to create a third path that eliminates the highest highs and the lowest lows, and forms a mid-frequency crossover section. This is naturally called a 3-way system. (See diagram) The "mid" section forms a bandpass filter, since it only passes a specific frequency band. Note from the diagram that the high frequency passband and low frequency passband terms are often shortened to just high-pass and low-pass. A 3-way system allows optimizing each driver for a narrower band of frequencies, producing a better overall sound.
So why not just use passive boxes?
Problems
The single biggest problem is that one passive cabinet (or a pair) won't play loud enough and clean enough for large spaces. If the sound system is for your bedroom or garage, passive systems would work just fine -- maybe even better. But it isn't. Once you try to fill a relatively large space with equally loud sound you start to understand the problems. And it doesn't take stadiums, just normal size clubs. It is really difficult to produce the required loudness with passive boxes. Life would be a lot easier if you could just jack everyone into their own cans amp -- like a bunch of HC 4 or HC 6 Headphone Amps scattered throughout the audience. Let them do the work; then everyone could hear equally well, and choose their own listening level. But life is hard, and headphone amps must be restricted to practice and recording.
Monitor speakers on the other hand most likely have passive crossovers. Again, it's a matter of distance and loudness. Monitors are usually close and not overly loud -- too loud and they will feed back into your microphone or be heard along with the main mix: not good. Monitor speakers are similar to hi-fi speakers, where passive designs dominate ... because of the relatively small listening areas. It is quite easy to fill small listening rooms with pristine sounds even at ear-splitting levels. But move those same speakers into your local club and they will sound thin, dull and lifeless. Not only will they not play loud enough, but they may need the sonic benefits of sound bouncing off close walls to reinforce and fill the direct sound. In large venues, these walls are way too far away to benefit anyone.
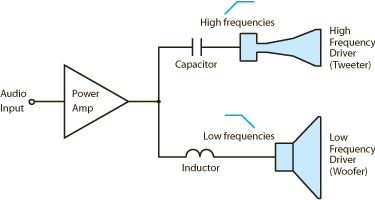
Figure 1. Passive 2-Way Crossover
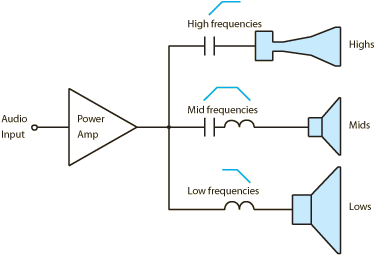
Figure 2. Passive 3-Way Crossover
So why not use a bunch of passive boxes? You can, and some people do. However, for reasons to follow, it only works for a couple of cabinets. Even so, you won't be able to get the high loudness levels if the room is large. Passive systems can only be optimized so much.
Once you start needing multiple cabinets, active crossovers become necessary. To get good coverage of like-frequencies, you want to stack like-drivers. This prevents using passive boxes since each one contains (at least) a high-frequency driver and a low-frequency driver. It's easiest to put together a sound system when each cabinet covers only one frequency range. For instance, for a nice sounding 3-way system, you would have low-frequency boxes (the big ones), then medium-sized mid-frequency boxes and finally the smaller high-frequency boxes. These would be stacked or hung, or both -- in some sort of array. A loudspeaker array is the optimum stacking shape for each set of cabinets to give the best combined coverage and overall sound. You've no doubt seen many different array shapes. There are tall towers, high walls, and all sorts of polyhedrons and arcs. The only efficient way to do this is with active crossovers.
Some smaller systems combine active and passive boxes. Even within a single cabinet it is common to find an active crossover used to separate the low- and mid-frequency drivers, while a built-in passive network is used for the high-frequency driver. This is particularly common for super tweeters operating over the last audio octave. At the other end, an active crossover often is used to add a subwoofer to a passive 2-way system. All combinations are used, but each time a passive crossover shows up, it comes with problems.
One of these is power loss. Passive networks waste valuable power. The extra power needed to make the drivers louder, instead boils off the components and comes out of the box as heat -- not sound. Therefore, passive units make you buy a bigger amp.
A couple of additional passive network problems has to do with their impedance. Impedance restricts power transfer; it's like resistance, only frequency sensitive. In order for the passive network to work exactly right, the source impedance (the amplifier's output plus the wiring impedance) must be as close to zero as possible and not frequency-dependent, and the load impedance (the loudspeaker's characteristics) must be fixed and not frequency-dependent (sorry, not in this universe; only on Star Trek). Since these things are not possible, the passive network must be (at best), a simplified and compromised solution to a very complex problem. Consequently, the crossover's behavior changes with frequency -- not something you want for a good sounding system.
One last thing to make matters worse. There is something called back-emf (back-electromotive force: literally, back-voltage) which further contributes to poor sounding speaker systems. This is the phenomena where, after the signal stops, the speaker cone continues moving, causing the voice coil to move through the magnetic field (now acting like a microphone), creating a new voltage that tries to drive the cable back to the amplifier's output! If the speaker is allowed to do this, the cone flops around like a dying fish. It does not sound good! The only way to stop back-emf is to make the loudspeaker "see" a dead short, i.e., zero ohms looking backward, or as close to it as possible -- something that's not gonna happen with a passive network slung between it and the power amp.
All this, and not to mention that inductors saturate at high signal levels causing distortion -- another reason you can't get enough loudness. Or the additional weight and bulk caused by the large inductors required for good low frequency response. Or that it is almost impossible to get high-quality steep slopes passively, so the response suffers. Or that inductors are way too good at picking up local radio, TV, emergency, and cellular broadcasts, and joyfully mixing them into your audio.
Such is life with passive speaker systems.

Figure 3. Active 2-Way Crossover
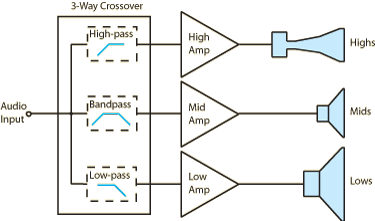
Figure 4. Active 3-Way Crossover
Active
Active crossover networks require a power supply to operate and usually come packaged in single-space, rack-mount units. (Although of late, powered loudspeakers with built-in active crossovers and power amplifiers are becoming increasingly popular.) Looking at the accompanying diagram shows how active crossovers differ from their passive cousins. For a 2-way system instead of one power amp, you now have two, but they can be smaller for the same loudness level. How much smaller depends on the sensitivity rating of the drivers (more on this later). Likewise a 3-way system requires three power amps. You also see and hear the terms bi-amped, and tri-amped applied to 2- and 3-way systems.
Active crossovers cure many ills of the passive systems. Since the crossover filters themselves are safely tucked away inside their own box, away from the driving and loading impedance problems plaguing passive units, they can be made to operate in an almost mathematically perfect manner. Extremely steep, smooth and well-behaved crossover slopes are easily achieved by active circuitry.
There are no amplifier power loss problems, since active circuits operate from their own low voltage power supplies. And with the inefficiencies of the passive network removed, the power amps more easily achieve the loudness levels required.
Loudspeaker jitters and tremors caused by inadequately damped back-emf all but disappear once the passive network is removed. What remains is the amplifier's inherent output impedance and that of the connecting wire. Here's where the term damping factor comes up. [Note that the word is damp-ing, not damp-ning as is so often heard; impress your friends.] Damping is a measure of a system's ability to control the motion of the loudspeaker cone after the signal disappears. No more dying fish.
Siegfried & Russ
Active crossovers go by many names. First, they are either 2-way or 3-way (or even 4-way and 5-way). Then there is the slope rate and order: 24 dB/oct (4th-order), or 18 dB/oct (3rd-order), and so on. And finally there is a name for the kind of design. The two most common being Linkwitz-Riley and Butterworth, named after Siegfried Linkwitz and Russ Riley who first proposed this application, and Stephen Butterworth who first described the response in 1930. Up until the mid `80s, the 3rd-order (18 dB/oct) Butterworth design dominated, but still had some problems. Since then, the development (pioneered by Rane and Sundholm) of the 4th-order (24 dB/oct) Linkwitz-Riley design solved these problems, and today is the norm.
What this adds up to is active crossovers are the rule. Luckily, the hardest thing about an active crossover is getting the money to buy one. After that, most of the work is already done for you. At the most basic level all you really need from an active crossover are two things: to let you set the correct crossover point, and to let you balance driver levels. That's all. The first is done by consulting the loudspeaker manufacturer's data sheet, and dialing it in on the front panel. (That's assuming a complete factory-made 2-way loudspeaker cabinent, for example. If the box is homemade, then both drivers must be carefully selected so they have the same crossover frequency, otherwise a severe response problem can result.) Balancing levels is necessary because high frequency drivers are more efficient than low frequency drivers. This means that if you put the same amount of power into each driver, one will sound louder than the other. The one that is the most efficient plays louder. Several methods to balance drivers are always outlined in any good owner's manual.
Equalizers
You may have heard it said that equalizers are nothing more than glorified tone controls. That's pretty accurate and helps explain their usefulness and importance. Simply put, equalizers allow you to change the tonal balance of whatever you are controlling. You can increase (boost) or decrease (cut) on a band-by-band basis just the desired frequencies. Equalizers come in all different sizes and shapes, varying greatly in design and complexity. Select from a simple single-channel unit with 10 controls on 1-octave frequency spacing (a mono 10-band octave equalizer), all the way up to a full-featured, two-channel box with 31 controls on 1/3-octave frequency spacing (a stereo 1/3-oct equalizer). There are graphic models with slide controls (sliders) that roughly "graph" the equalizer's frequency response by the shape they form, and there are parametric models where you choose the frequency, amplitude, and bandwidth desired (the filter parameters - see diagram below) for each band provided. Far and away, the simplest and most popular are the 1/3- and 2/3-octave graphics. They offer the best combination of control, complexity and cost.
In selecting graphic equalizers, the primary features to consider are the number of input/output channels, the number of boost/cut bands, the center-frequency spacing of each, and the accuracy of the output vs. the front panel settings. Up until the recent development of true response graphics, the front panel settings only approximated the equalizer's actual response. Prior to true response graphics, adjacent band interaction caused the actual output response to deviate from the front panel settings. Described as either constant-Q or variable-Q (see diagrams), the individual filter bandwidth behavior determined the interaction. In the early '80s, Rane developed the first constant-Q designs to preserve the same shape (bandwidth) over the entire boost/cut range. In contrast, variable-Q designs have varying bandwidths (the shape changes) as a function of boost/cut amount. Rane's constant-Q design offered a big improvement in output response vs. front panel settings and became the most popular design until Rane and others developed the first true response graphic equalizers. Now true response graphics offer the best response.
Using Equalizers
Equalizers can do wonders for a sound system. Let's start with loudspeaker performance. An unfortunate truth regarding budget loudspeakers is they don't sound very good. Usually this is due to an uneven frequency response, or more correctly a non-flat power response. An ideal cabinet has a flat power response. This means that if you pick, say, 1 kHz as a reference signal, use it to drive the speaker with exactly one watt, measure the loudness, and sweep the generator over the speaker's entire frequency range, all frequencies will measure equally loud. Sadly, with all but the most expensive speaker systems, they will not. Equalizers can help these frequency deficiencies. By adding a little here and taking away a little there, pretty soon you create an acceptable power response - and a whole lot better sounding system. It's surprising how just a little equalization can change a poor sounding system into something quite decent.
The best way to deal with budget speakers -- although it costs more -- is to commit one equalizer channel for each cabinet. This becomes a marriage. The equalizer is set, a security cover is bolted-on, and forever more they are inseparable. (Use additional equalizers to assist with the room problems.) And now for the hard part, but the most important part: If you do your measurements outside (no reflections off walls or ceiling) and up in the air (no reflections off the ground) you can get a very accurate picture of just the loudspeaker's response, free from room effects. This gives you the room-independent response. This is really important, because no matter where this box is used, it has these problems. Of course, you must make sure the cost of the budget speaker plus the equalizer adds up to substantially less than buying a really flat speaker system to begin with. Luckily (or should this be sadly) this is usually the case. Again, the truth is that most cabinets are not flat. It is only the very expensive loudspeakers that have world-class responses. (Hmmm ... maybe that's why they cost so much!)
The next thing you can do with equalizers is to improve the way each venue sounds. Every room sounds different -- fact of life -- fact of physics. Using exactly the same equipment, playing exactly the same music in exactly the same way, different rooms sound different -- guaranteed. Each enclosed space treats your sound differently.
Reflected sound causes the problems. What the audience hears is made up of the direct sound (what comes straight out of the loudspeaker directly to the listener) and reflected sound (it bounces off everything before getting to the listener). And if the room is big enough, then reverberation comes into play, which is all the reflected sound that has traveled so far, and for such a (relatively) long time that it arrives and re-arrives at the listener delayed enough to sound like a second and third source, or even an echo if the room is really big.
It's basically a geometry problem. Each room differs in its dimensions; not only in its basic length-by-width size, but in its ceiling height, the distance from you and your equipment to the audience, what's hung (or not hung), on the walls, how many windows and doors there are, and where. Every detail about the space affects your sound. And regretfully, there is very little you can do about any of it. Most of the factors affecting your sound you cannot change. You certainly can't change the dimensions, or alter the window and door locations. But there are a few things you can do, and equalization is one of them. But before you equalize you want to optimize how and where you place your speakers. This is probably the number one item to attend to. Keep your loudspeakers out of corners whenever possible. Remove all restrictions between your speakers and your audience, including banners, stage equipment, and performers. What you want is for most of the sound your audience hears to come directly from the speakers. You want to minimize all reflected sound. If you have done a good job in selecting and equalizing your loudspeakers, then you already know your direct sound is good. So what's left is to minimize the reflected sound.
Next use equalization to help with some of the room's more troublesome features. If the room is exceptionally bright you can beef up the low end to help offset it, or roll-off some of the highs. Or if the room tends to be boomy, you can tone-down the low end to reduce the resonance. Another way EQ is quite effective is in controlling troublesome feedback tones. Feedback is that terrible squeal or scream sound systems get when the audio from the loudspeaker gets picked-up by one of the stage microphones, re-amplified and pumped out the speaker, only to be picked-up again by the microphone, and re-amplified, and so on. Most often, this happens when the system is playing loud. Which makes sense, because for softer sounds, the signal either isn't big enough to make it to the microphone, or if it does, it is too small to build-up. The problem is one of an out-of-control, closed-loop, positive-feedback system building up until something breaks, or the audience leaves. Use your equalizer to cut those frequencies that want to howl; you not only stop the squeal, but you allow the system to play louder. The technical phrase for this is maximizing system gain before feedback.
It's important to understand at the beginning that you cannot fix room related sound problems with equalization, but you can move the trouble spots around. You can rearrange things sonically, which helps tame excesses. You win by making it sound better. Equalization helps.
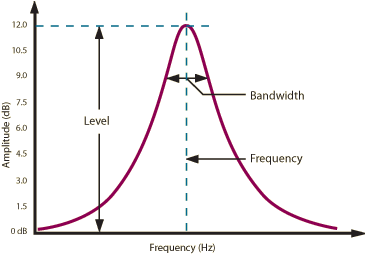
Figure 5. Bandpass Filter Parameters
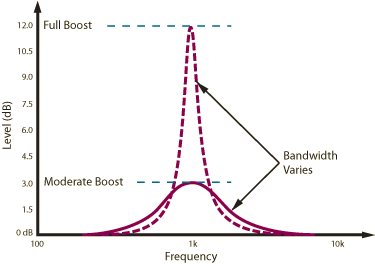
Figure 6. Variable-Q Graphic
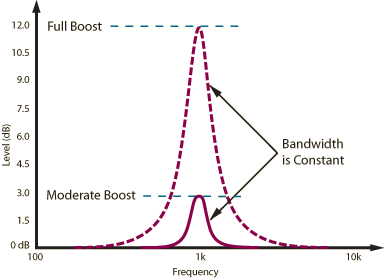
Figure 7. Constant-Q Graphic
Equalizers are useful in augmenting your instrument or voice. With practice you will learn to use your equalizer to enhance your sound for your best personal expression: deepen the lows, fill the middle, or exaggerate the highs ... whatever you want. Just as an equalizer can improve the sound of a poor loudspeaker, it can improve the sound of a marginal microphone, or enhance any musical instrument. Equalizers give you that something extra, that edge. (We all know where "radio voices" really come from.)
Seeing Sound
To make loudspeaker and sound system measurements easy, you need a real-time analyzer (RTA). An RTA allows you to see the power response, not only for the loudspeaker, but even more importantly, for the whole system. Stand-alone RTAs use an LED or LCD matrix to display the response. A built-in pink noise generator (a special kind of shaped noise containing all audible frequencies, optimized for measuring sound systems) is used as the test signal. A measuring microphone is included for sampling the response. The display is arranged to show amplitude verses frequency. Depending upon cost, the number of frequency columns varies from 10 on 1-octave centers, up to 31 on 1/3-octave centers (agreeing with graphic equalizers). Amplitude range and precision varies with price. With the cost of laptop computers tumbling, the latest form of RTA involves an accessory box and software that works with your computer. These are particularly nice, and loaded with special memory, calculations and multipurpose functions like also being an elaborate SPL meter. Highly recommended if the budget allows.
Dynamic Controllers
Dynamic controllers or processors represent a class of signal processing devices used to alter an audio signal based solely upon its frequency content and amplitude level, thus the term "dynamic" since the processing is completely program dependent. The two most common dynamic effects are compressors and expanders, with limiters and noise gates (or just "gates") being special cases of these.
The dynamic range of an audio passage is the ratio of the loudest (undistorted) signal to the quietest (just audible) signal, expressed in dB. Usually the maximum output signal is restricted by the size of the power supplies (you cannot swing more voltage than is available), while the minimum output signal is fixed by the noise floor (you cannot put out an audible signal less than the noise). Professional-grade analog signal processing equipment can output maximum levels of +26 dBu, with the best noise floors being down around -94 dBu. This gives a maximum dynamic range of 120 dB (equivalent to 20-bit digital audio) -- pretty impressive number -- but very difficult to work with. Thus were born dynamic processors.
Compressors
Compressors are signal processing units used to reduce (compress) the dynamic range of the signal passing through them. The modern use for compressors is to turn down just the loudest signals dynamically. For instance, an input dynamic range of 110 dB might pass through a compressor and exit with a new dynamic range of 70 dB. This clever bit of processing is normally done using a VCA (voltage controlled amplifier) whose gain is determined by a control voltage derived from the input signal. Therefore, whenever the input signal exceeds the threshold point, the control voltage becomes proportional to the signal's dynamic content. This lets the music peaks turn down the gain. Before compressors, a human did this at the mixing board and we called it gain-riding. This person literally turned down the gain anytime it got too loud for the system to handle.
You need to reduce the dynamic range because extreme ranges of dynamic material are very difficult for sound systems to handle. If you turn it up as loud as you want for the average signals, then along comes these huge musical peaks, which are vital to the punch and drama of the music, yet are way too large for the power amps and loudspeakers to handle. Either the power amps clip, or the loudspeakers bottom out (reach their travel limits), or both -- and the system sounds terrible. Or going the other way, if you set the system gain to prevent these overload occurrences, then when things get nice and quiet, and the vocals drop real low, nobody can hear a thing. It's always something. So you buy a compressor.
Using it is quite simple: Set a threshold point, above which everything will be turned down a certain amount, and then select a ratio defining just how much a "certain amount" is. All audio below the threshold point is unaffected and all audio above this point is compressed by the ratio amount. The earlier example of reducing 110 dB to 70 dB requires a ratio setting of 1.6:1 (110/70 = 1.6). The key to understanding compressors is to always think in terms of increasing level changes in dB above the threshold point. A compressor makes these increases smaller. From our example, for every 1.6 dB increase above the threshold point the output only increases 1 dB. In this regard compressors make loud sounds quieter. If the sound gets louder by 1.6 dB and the output only increases by 1 dB, then the loud sound has been made quieter.
Some compressors include attack and release controls. The attack time is the amount of time that passes between the moment the input signal exceeds the threshold and the moment that the gain is actually reduced. The release time is just the opposite -- the amount of time that passes between the moment the input signal drops below the threshold and the moment that the gain is restored. These controls are very difficult to set, and yet once set, rarely need changing. Because of this difficulty, and the terrible sounding consequences of wrong settings, Rane correctly presets these controls to cover a wide variety of music and speech -- one less thing for you to worry about.
System overload is not the only place we find compressors. Another popular use is in the making of sound. For example when used in conjunction with microphones and musical instrument pick-ups, compressors help determine the final timbre (tone) by selectively compressing specific frequencies and waveforms. Common examples are "fattening" drum sounds, increasing guitar sustain, vocal "smoothing," and "bringing up" specific sounds out of the mix, etc. It is quite amazing what a little compression can do. Check your owner's manual for more tips.
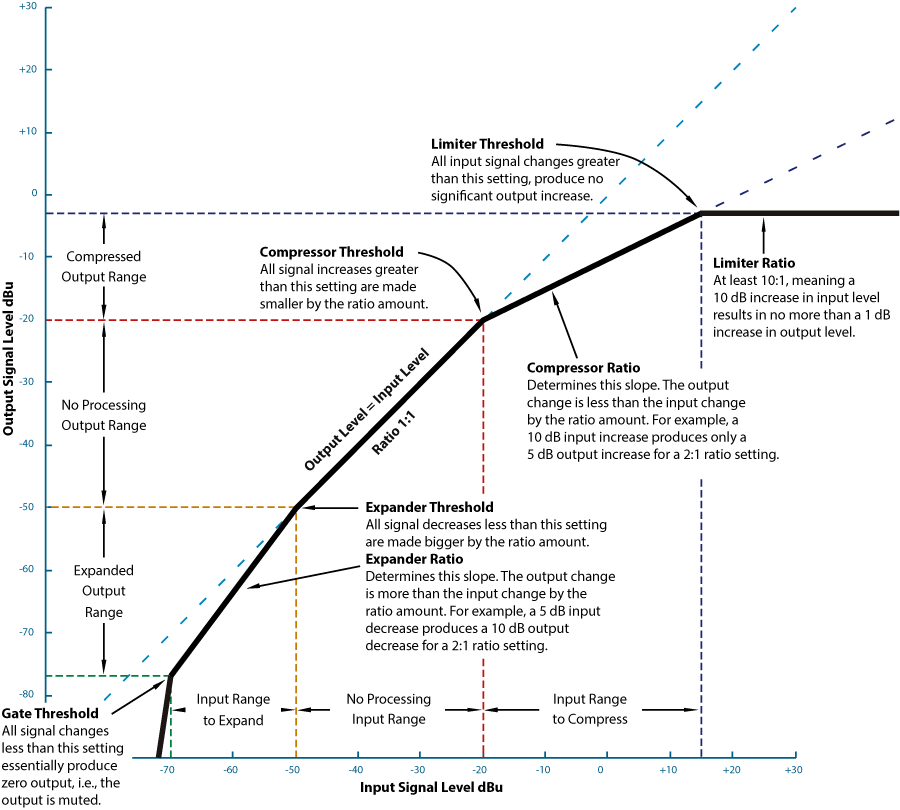
Figure 8. Gate/Expander/Compressor/Limiter Action
Expanders
Expanders are signal processing units used to increase (expand) the dynamic range of the signal passing through it. However, modern expanders operate only below the set threshold point, that is, they operate only on low-level audio. Operating in this manner they make the quiet parts quieter. The term downward expander or downward expansion evolved to describe this type of application. The most common use is noise reduction. For example, say, an expander's threshold level is set to be just below the quietest vocal level being recorded, and the ratio control is set for 2:1. What happens is this: when the vocals stop, the signal level drops below the set point down to the noise floor. There has been a step decrease from the smallest signal level down to the noise floor. If that step change is, say, -10 dB, then the expander's output attenuates 20 dB (i.e., due to the 2:1 ratio, a 10 dB decrease becomes a 20 dB decrease), thus resulting in a noise reduction improvement of 10 dB. It's now 10 dB quieter than it would have been without the expander.
Limiters
Limiters are compressors with fixed ratios of 10:1 or greater. Here, the dynamic action prevents the audio signal from becoming any bigger than the threshold setting. For example, say the threshold is set for +16 dBu and a musical peak suddenly comes along and causes the input to jump by 10 dB to +26 dB, the output will only increase by 1 dB to +17 dBu -- basically remaining level. Limiters find use in preventing equipment and recording media overloads. A limiter is the extreme case of compression.
You will hear the term pumping used in conjunction with poorly designed or improperly set limiters. Pumping describes an audible problem caused by actually hearing the gain change -- it makes a kind of "pumping" sound. This is particularly a problem with limiters that operate too abruptly. Rest assured that Rane limiters are designed not to have any audible side-effects.
Noise Gates
Noise gates (or gates) are expanders with fixed "infinite" downward expansion ratios. They are used extensively for controlling unwanted noise, such as preventing "open" microphones and "hot" instrument pick-ups from introducing extraneous sounds into your system. When the incoming audio signal drops below the threshold point, the gate prevents further output by reducing the gain to "zero." Typically, this means attenuating all signals by about 80 dB. Therefore once audio drops below the threshold, the output level basically becomes the residual noise of the gate. Common terminology refers to the gate "opening" and "closing." A gate is the extreme case of downward expansion.
Just as poorly designed limiters can cause pumping, poorly designed gates can cause breathing. The term breathing is used to describe an audible problem caused by being able to hear the noise floor of a product rise and lower, sounding a lot like the unit was "breathing." It takes careful design to get all the dynamic timing exactly right so breathing does not occur. Rane works very hard to make sure all of its dynamic processors have no audible funny business.
Another popular application for noise gates is to enhance musical instrument sounds, especially percussion instruments. Correctly setting a noise gate's attack (turn-on) and release (turn-off) adds "punch," or "tightens" the percussive sound, making it more pronounced -- this is how Phil Collins gets his cool snare sound, for instance.
 "Signal Processing Fundamentals" This note in PDF.