Adjust Elements to Refine the Layout
Once all of your controls and other page elements are on the page, you might want to adjust them in various ways to improve the page appearance or usability. The following are common things that you can do.
You can move any page element to another position on the control page by clicking on it and dragging the element as desired.
note: The Layout Workspace uses an eight pixel grid and normally positions element edges on grid boundaries. If you would like to move an element off-grid, press the Alt key when dragging with your mouse, which allows positioning to any location on the workspace.
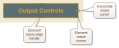
Many page elements have more than one size so that you can emphasize one element over another by making one larger than the other. Do this by double-clicking on the page element and setting the size drop-down to another setting. For example, the following shows how to change a level control to the Large size:

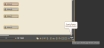
In addition to the size settings, you can also resize most elements in one or both directions. For example, you might want an image to be larger or a workspace label to be wider. You manually adjust the width or height of a page element by hovering over it in the page layout area, choosing a re-sizable edge or corner, clicking and dragging it to a new position. An edge or corner is re-sizable if the resize handle appears in the outline of the element when you hover over it or select it:
note: Position and width/height can also be set from the element property dialog.
note: The Layout Workspace uses an eight pixel grid and normally positions element edges on grid boundaries. If you would like to resize an element off-grid, press the Alt key when dragging with your mouse, which allows resizing an edge to any location on the workspace.
The Halogen Control Pages system has built-in themes. A theme is a set of coordinated colors for the control page and all page elements. You can change to another theme to alter the look of the control page. To do this for the currently selected control page, click in a blank area of the page layout area (to ensure that no page elements are selected) and click on the Show Properties menu button in the Control Page Designer toolbar.
In the property dialog that opens, click on the Theme drop-down menu and choose another theme.
The following shows the same control page in two different themes: Light and Dark.


In addition to changing the color theme for a page, you can also change many of the individual element colors.
For example, to change a toggle control's Off State color from its theme color to green, do the following:
- Double click on the toggle control page element in the page layout area.
- In the property dialog that opens, find the Off State area and click on the Custom color chooser drop-down menu at the far right of the Indicator label.
- Scroll the color list until you find the green color that you want to use and click on it.

The Control Page designer includes a set of buttons in the Workspace Toolbar that allow you to align a set of selected elements on any side or on centers:
For example, suppose a set of toggle controls looked like this:
To change the positions of these controls so their left edges line up with the top-most control:
- Select all of the controls by clicking above and to the left of the top-most toggle and dragging the selection rectangle to the right and down so it encloses all three controls:

- Notice that the top-most toggle control has a darker border. This indicates the anchor element and all alignment operations will line up on this element when you click on one of the alignment buttons. To align the left edges of the three controls, click on the Align Left button in the Workspace Toolbar:

- The result:

The Control Page designer includes a set of buttons in the Workspace Toolbar that allow you to change a set of selected elements the same width or height:
For example, suppose a set of toggle controls looked like this:
To change the widths of these controls to match the width of the top-most control:
- Select all of the controls by clicking above and to the left of the top-most toggle and dragging the selection rectangle to the right and down so it encloses all three controls:

- Notice that the top-most toggle control has a darker border. This indicates the anchor element and all re-size operations use this element as the master size when you click on one of the re-size buttons. To make the three controls the same width, click on the Same Width button in the Workspace Toolbar:

- The result:

The Control Page designer includes a set of buttons in the Workspace Toolbar that allow you to evenly space a set of selected elements either horizontally or vertically:
For example, suppose a set of toggle controls looked like this:
To change the positions of these controls so they are evenly spaced vertically between the top-most and bottom-most controls:
- Select all of the controls by clicking above and to the left of the top-most toggle and dragging the selection rectangle to the right and down so it encloses all four controls:

- To evenly space the controls vertically on the page, click on the Evenly Space, Vertically button in the Workspace Toolbar:
- The result:
