You are here: Working in the Halogen Workspace > Working in the Processing Workspace > Working with the DSP Palette > Adding DSP Processing Blocks to the Processing Workspace
Adding DSP Processing Blocks to the Processing Workspace
DSP Processing blocks are added to the Processing Workspace via drag and drop from the DSP Palette.
Add a single DSP Processing block to the Processing Workspace
- Open the DSP Tab on the Processing Workspace palette.
- Expand block categories and scroll to the particular block you want to add to the workspace.
- You have two options for adding the block to the workspace:
- Click on the block and drag it to the Processing Workspace. (Hold the block at the edges of the workspace auto-scroll to other areas). Once the hashed drop target is in position release the mouse button to add the block to the workspace.
- Double-click on the block to add it to the right of the currently selected workspace block(s). If nothing is selected the block will be positioned in the middle of the visible portion of the workspace.
Add multiple DSP Processing blocks to the Processing Workspace
- Open the DSP Tab on the Processing Workspace palette.
- Expand block categories and scroll to the particular block you want to add to the workspace.
- You have two options for adding multiple instances of the block to the workspace:
- Click on the block and drag it to the Processing Workspace. (Holding the block at the edges of the workspace will auto-scroll to other areas). Once the hashed drop target is in position and before releasing the mouse button press and hold down the number key corresponding to the number of times you want the block added to the workspace. (For example: Holding down the 5 key would result in the specified block being added 5 times in a vertical column with the top block in the specified drop position)
- Press and hold down the number key corresponding to the number of times you want the block added to the workspace, then double-click on the block to add it to the workspace. This results in 'x' number of block instances being added to the workspace to the right of the currently selected workspace block(s). If nothing is selected the blocks are positioned in the middle of the visible portion of the workspace. (For example: Holding down the 5 key would result in the specified block being added 5 times in a vertical column)
Specify node counts when adding variable node count DSP Processing blocks to the Processing Workspace
- Open the DSP Tab on the Processing Workspace palette.
- Expand block categories and scroll to the particular block you want to add to the workspace.
- You have two options for adding the block to the workspace:
- Click on the block and drag it to the Processing Workspace. (Holding the block at the edges of the workspace will auto-scroll to other areas). Once the hashed drop target is in position and before releasing the mouse button press and hold down the Shift key. When the mouse button is released a dialog opens for specifying the number of input and/or output nodes for the block.
- Press and hold down the Shift key, then double-click on the block. A dialog opens for specifying the number of input and/or output nodes for the block. Once the dialog is dismissed (see step 4 below) the new block is added to the right of the currently selected workspace block(s). If nothing is selected the block is positioned in the middle of the visible portion of the workspace.
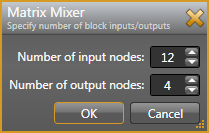
- Specify the number of input and output nodes desired then click the OK button and a new block with the specified node counts is added to the workspace.