Logic Out Controls
- Click the Processing tab to open the Processing Workspace.
- On the Processing Palette, click the Control tab.
- Click the arrow next to a Logic Out category in the palette to expand the list and show the individual Logic Out controls.
- Click the control name, which is a hyperlink, to open its properties.

Provides a central location for:
- linking the Logic Out control(s) with one or more other control(s) in the system
- changing which item is selected (Selector control only)
- customizing the name (displayed in the software) of each item in the selection list (Selector control only)
- changing the Toggle state (Toggle control only)
| UI Element | Purpose |
|---|---|
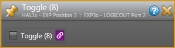
| Toggle |
Reflects the current state of the Toggle control—on (checkbox is selected) or off (checkbox is not selected), which you can control from within the software. note: Logic Out ports default to the Toggle mode. You can, however, change the mode configuration. From this properties dialog box, you can link the control to a Toggle control on the Processing Map (for example, a Mute control). To do so, click, drag, and drop the Logic Out Toggle link icon onto the link icon of the Toggle control on the Processing Map. |
| UI Element | Purpose |
|---|---|
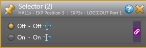
| Selections |
Displays the two selections available on the control (On/Off). note: Logic Out ports default to the Toggle mode. To use the Selector control, you must change the mode configuration of the port. From this properties dialog box, you can link the control to a Selector control on the Processing Map (with only two selections on it). To do so, click, drag, and drop the Logic Out Selector link icon onto the link icon of the Selector control on the Processing Map. Provide custom names for each selection by clicking the edit icon and then typing in the edit box that appears. This name is visible in the software only. |