DR2 Device Control Properties
- Click the Processing tab to open the Processing Workspace.
- On the Processing Palette, click the Control tab.
- In the Digital Remote Ports category (or Remote Audio Device Ports category as DRs can connect to those ports as well), click a DR2 device name, which is a hyperlink, to open its properties.
Provides a central location for:
- Configuring the mode for the DR2 device
- Setting the display font for the DR2 device.
- Establishing a control links between the DR2 controls and other controls
- Viewing and changing each control's name
- Setting the Display Label text for each control
- Viewing and updating the current value of each control
- Enabling and disabling each control
- Adding each control to a preset and updating the baseline preset to current control settings
- Viewing a simulation of how the controls look on a DR2 display
| UI Element | Purpose |
|---|---|
| Title Bar Name | Area at the top of the properties dialog box that displays the DR's Device Name as well as the HAL/EXP device model, the HAL/EXP port to which the DR is connected, and the DR model:  |
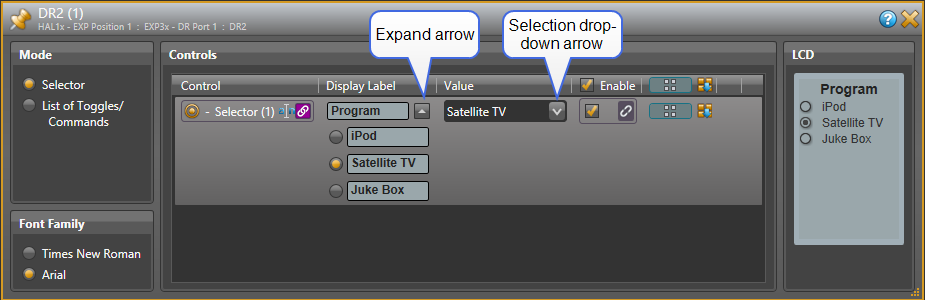
| Mode panel |
Selects the control mode for the DR2. Selector provides a single selector control. List of Toggles/Commands provides a configurable set of Toggle and/or Command controls. For more information about configuring device modes for all Digital Remote models, see Configuring Remote Device Control Modes. |
| Font Family panel | Select the font for all labels and values shown on the DR device. You can choose between Times New Roman and Arial fonts. |
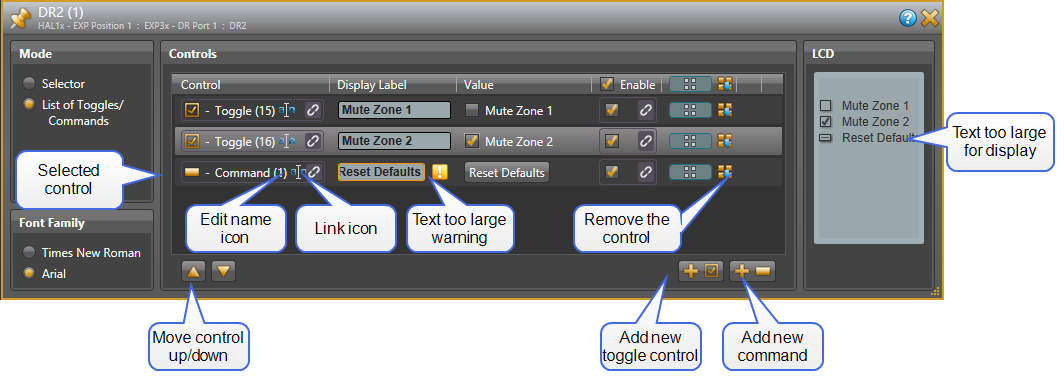
| Controls panel |
This panel contains a list of the controls configured for the DR2. When List of Toggles/Commands is selected, the panel also shows buttons that allow you to move the selected control up or down in the list and to add a new toggle or command control to the end of the list. To select a control, click on anywhere inside the control's row area in the list. |
| Control |
Shows the control type icon and name of the control as well as the standard control link icon. You can change the control name by clicking on the edit name icon. You can link the control to another control of the same type on the Processing Map (for example, a Mute control). To do so, click, drag, and drop the control's link icon onto the link icon of the control on the Processing Map. |
| Display Label |
Shows the label that will appear on the DR device. You can type a custom label in the edit box. note: A yellow border and warning icon appears if not all of the text will be visible on the DR2 LCD. warning! Halogen stores display names for DR controls in the baseline preset and in any other presets that you've added the control to. This means that after you have changed a DR display name, you should update the control in the appropriate presets. If you don't, the next time a preset that includes the control (including the baseline) is activated, the display label that you just entered is lost. To update a DR control in the baseline preset after changing the display label, click the Update Baseline Preset button on the far right: |
| Value |
Displays and allows you to change the current state of the DR2 control according to its control type. Selector: Choose a new value by clicking on the drop-down arrow and selecting an item. Toggle: check or uncheck the Value checkbox Command: Assert the command by clicking on the button. |
| Enable |
Designates whether or not this DR control is enabled. You can manually enable or disable the control from within the software, or provide end users with the ability to enable or disable the control—by saving the desired state to a preset that is exposed to end users, or by linking the Enable Toggle control to another Toggle control. When a control is disabled, it does not appear on the display of the Digital Remote device. The control is still functional in Halogen, but the user cannot use the control on the physical DR. You can use this setting to selectively change which controls the user is able to view and use on each DR depending on your application. |
|
Preset icon and Update Baseline Preset button |
The preset icon, When you click on the Update Baseline Preset button, |
| Remove control icon | This icon appears when you hover with your mouse over a control item in the list and it is possible to remove the item. Click on the icon to remove the control from the list. |
|
LCD panel |
Displays a representation of the LCD on the DR2. This gives you an idea of what the DR2 will actually display for the controls configured for the Digital Remote. |
 .
. , allows you to add one or all DR2 controls to a preset. When you drag the icon in the header area and drop it on a valid preset drop target, Halogen adds all of the DR2 controls to the preset. If you drag the preset icon from an individual control, Halogen only adds that control to the target preset.