Creating the Example Configuration
To get started, all of the work is done in the processing workspace, so click on the Processing tab in the upper right section of the Halogen application.
Click on the tab for the I/O palette and drag the first five HAL1x Mic/Line inputs from the palette and drop them on the left side of the processing map. In a similar way, drag the first three HAL1x Line Outputs from the palette and drop them on the right side of the processing map.
Next, fill in the middle processing area by clicking on the DSP palette tab and dragging four processing blocks to the processing map: Parametric EQ, Distributed Program Bus, Room Combine, and Selector. For the selector block, create one additional input and set the input names to Classical, Jazz, and Reggae. Also, delete room C from the Room Combine Processor by clicking the red ‘X’ in room C. Wire these together with your I/O blocks so that your processing map looks like this:
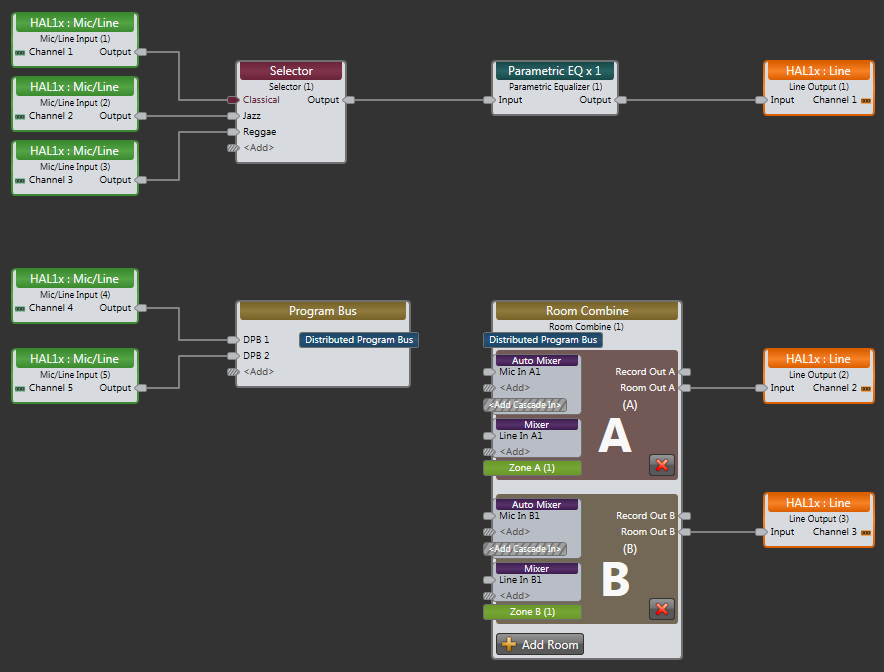
The top row of blocks provides audio for a lounge that has three program source inputs and some PEQ processing and the bottom row is a simple room combine configuration.
Next, we’ll add some external controls using the External Control Systems dialog and link them to some of the controls available in the processing blocks we are using.
First, we’ll create a control for the lounge input program selector:
- Just above the upper left of the Processing Workspace, click on the Control Systems button then select External Controls to open the External Control Systems property dialog.
- In the External Control Systems dialog, click on the Select tab.
- Create a new Selector control by clicking on the
 button.
 - Change the name of this new control by clicking the edit icon
 and entering Source Selector Control followed by the Enter key.
 - Set its number to 1.
- Double click the Selector block in the Processing Map to open its property dialog
- Link the new Selector control in the External Control dialog to the selector block’s selector control. Do this by dragging the link icon
 in the External Control Systems dialog to the right of the control name and dropping it on the link icon for the Selector Block’s selector control.
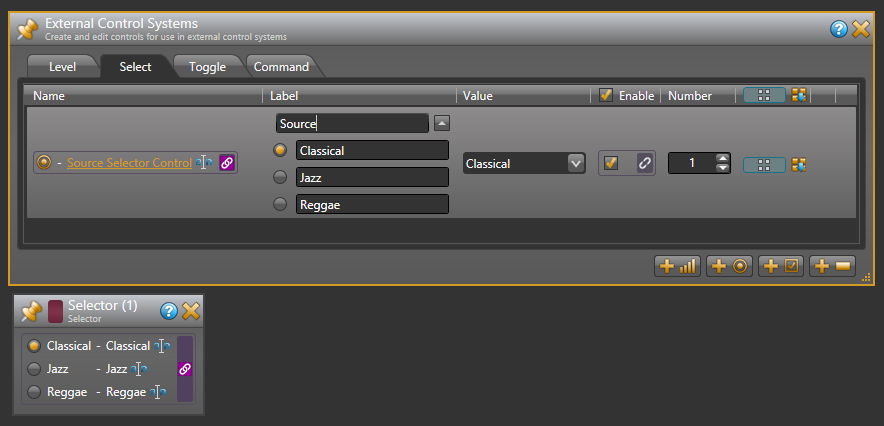
 - Change the Label in the Source Selector Control to "Source". Together, the selector property dialogs are as follows:
Your external control system can now get and set the lounge input source using the External Control Message Protocol.
Next, we’ll add a control for the lounge volume level:
- In the External Control Systems dialog, click on the Level tab.
- Create a new Level control by clicking on the
 button.
 - Change the name of this new control to Lounge Level Control and set its number to 6.
- Open the property dialog for the lounge output block, HAL1x Line Output (1).
- Link the new Level external control to the level control in the Line Output block property dialog. Do this by dragging the link icon in the External Control Systems dialog to the right of the control name and dropping it on the link icon for the Line Output Block’s level control.
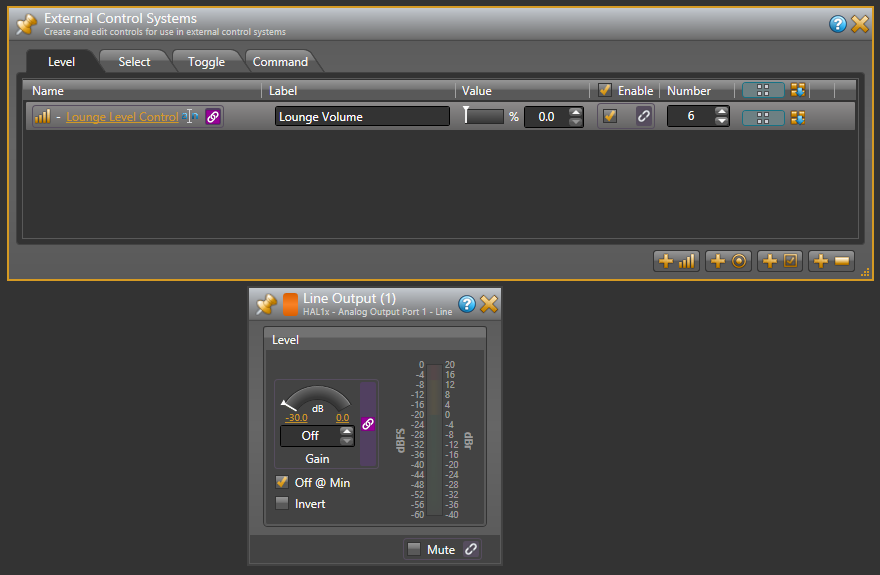
- Change the Label for the Lounge Level Control "Lounge Volume". The dialogs appear below as follows:
In a Room Combine application, end users typically need to let the audio system know when they open or close a movable wall. To create a Toggle control for this:
- Open the Room Combine Processor property dialog.
- Drag both Room A and Room B onto the Layout & Control area and arrange them so that they are next to each other.
- Add a movable wall between them by dragging the movable wall icon between the rooms until the wall highlights, then dropping the wall to create a wall toggle control.
- In the External Control Systems dialog, click on the Toggle tab.
- Add a new Toggle control by clicking on the
 button.
 - Change the name of the new control to Wall Toggle Control and set its number to 5.
- Link the new Toggle external control to the wall toggle control in the Room Layout & Control area. Do this by dragging the link icon in the External Control Systems dialog to the right of the control name and dropping it on the link icon for the wall toggle control between the two rooms.
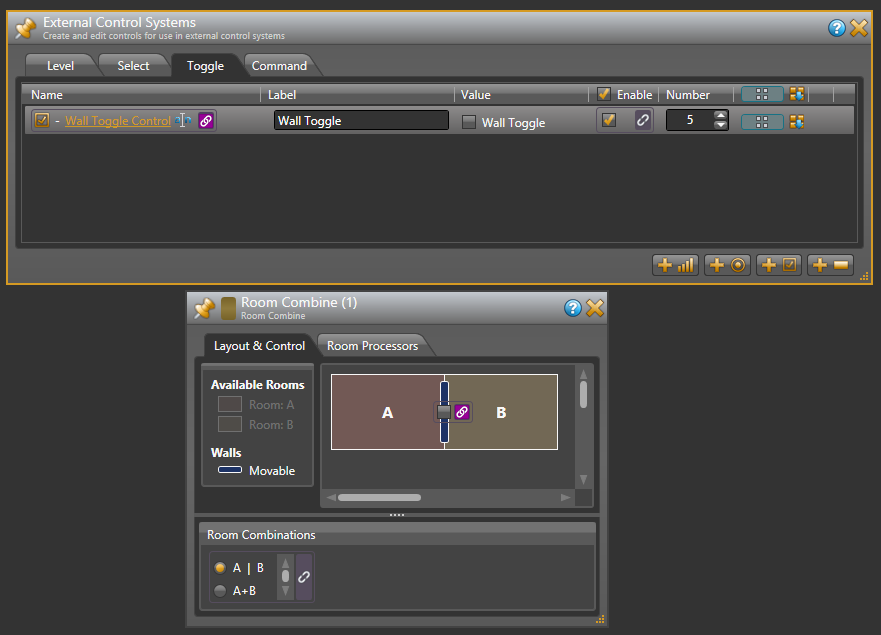
- Change the Label for the Wall Toggle Control to "Wall Toggle". The dialogs appear below as follows:
At this point, your external control system has access to three controls – a selector to get and set the lounge input program source, a level to control the lounge volume and a toggle to open and close the room combine wall.
Now we’ll add some controls and link them to presets of various kinds to show how you can provide access to presets to your external control system.
First, we’ll add a toggle control to mute all of the outputs in our configuration:
- On the Processing Workspace Toolbar, click on the Presets button to open the All Presets property dialog.
- In the All Presets dialog, click on the Toggle tab.
- Add a new toggle preset by clicking on the +Preset button.
- Rename this preset to Mute All Preset.
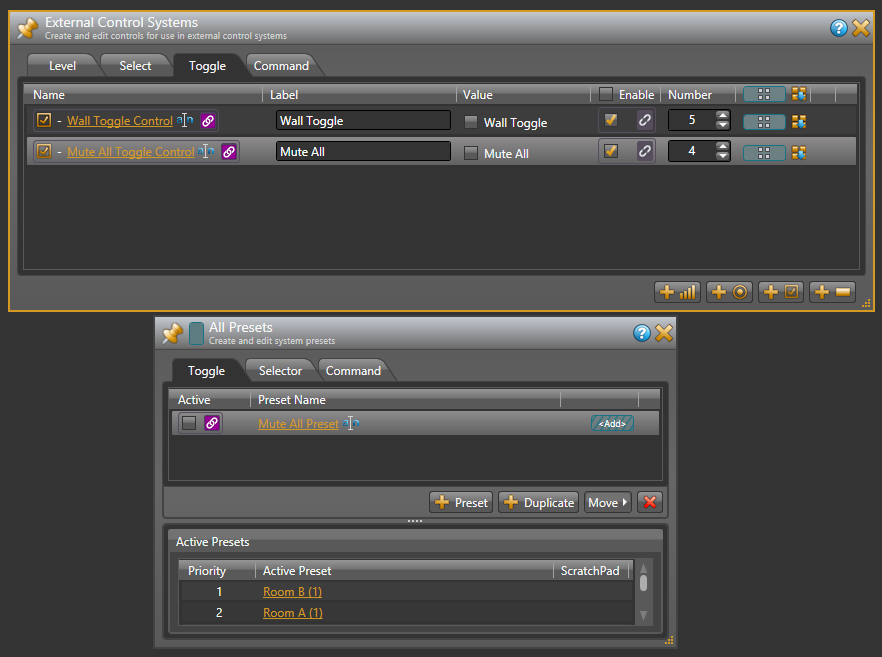
- In the External Control Systems dialog, click on the Toggle tab if it is not already displaying the toggle controls.
- Add a new Toggle external control by clicking on the button and set its number to 4.
- Rename this new control to Mute All Toggle Control.
- Link the new Mute All Toggle Control to the toggle control for the Mute All Preset. Do this by dragging the link icon in the External Control Systems dialog to the right of the control name and dropping it on the link icon for the Mute All Preset’s toggle control.
- Change the Label for the Mute All Toggle Control to "Mute All". The dialogs appear below as follows:
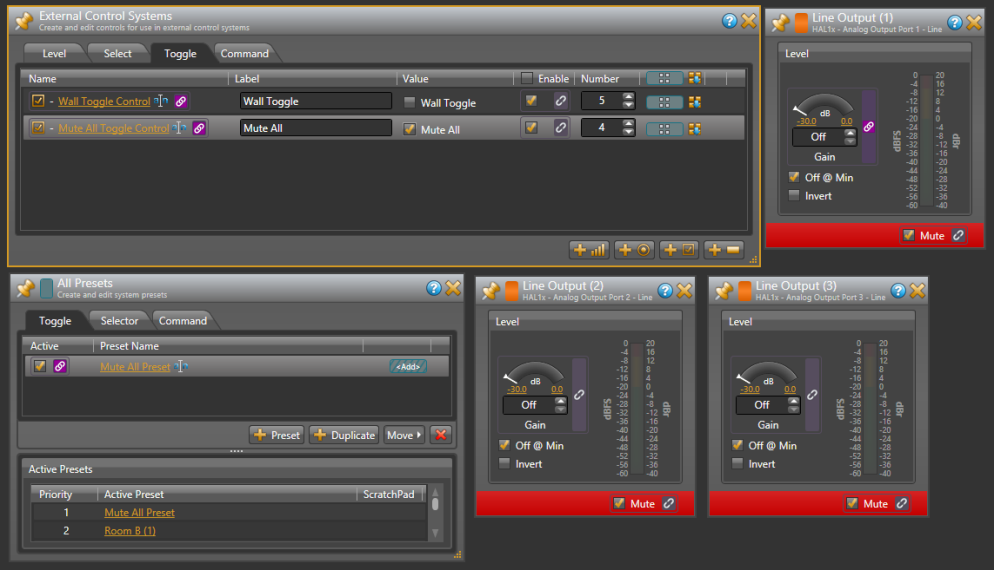
- Open the three HAL1x output blocks, set each of the mute checkboxes to checked (muted) and set their level controls all the way down (Off).
- Add the three HAL1x output blocks to the Mute All Preset. To do this, hover your mouse over the HAL1x output block for the lounge. Drag the blue preset icon
 that appears and drop it on the blue rectangle for the Mute All Preset in the All Presets dialog. Repeat for the other two HAL1x output blocks.
 - Test this by activating and deactivating the Mute All Preset from the All Presets dialog. All three HAL1x output blocks mute when the preset is active and un-mute when the preset is not active.
Now, we’ll add a Command control to reset all outputs to a default operating state:
- In the All Presets dialog, click on the Command tab.
- Create a new command preset by clicking on the +Preset button.
- Rename this new preset to Default Level Preset.
- In the External Control Systems dialog, change to the Toggle tab if it is not already selected.
- Make sure the Mute All Toggle Control toggle Value is un-checked.
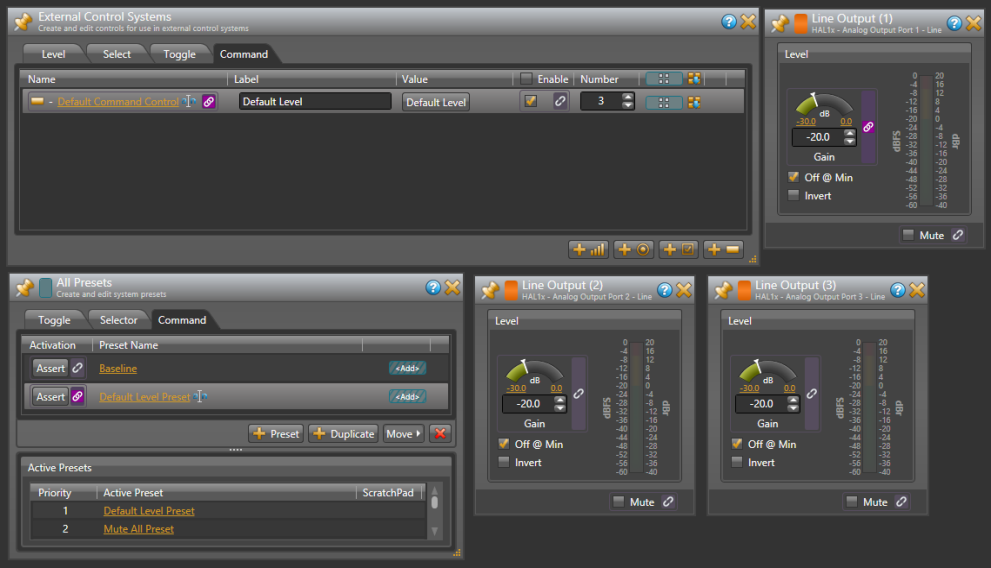
- Open the three HAL1x output blocks and set the level for each to -20.0 dB and un-check the mute toggle control.
- Add the three HAL1x output blocks to the new Default Level Preset by dragging the blue preset icon next to each HAL1x output block and dropping them on the blue rectangle for the Default Level Preset in the All Presets dialog.
- In the External Control Systems dialog, drag the blue preset icon for the Mute All Toggle Control and drop it on the blue rectangle for the Default Level Preset in the All Presets dialog. This ensures that the Mute All toggle is reset (unmuted) when the Default Level Preset is asserted.
- In the External Control Systems dialog click on the Command tab.
- Add a new Command external control by clicking on the
 button.
 - Rename this new control to Default Command Control and set its number to 3.
- Link the Default command control to the Default Level Preset’s Assert button. Do this by dragging the link icon in the External Control Systems dialog to the right of the control name and dropping it on the link icon for the Default Level Preset’s Assert button.
- Change the Default Command Control's Label to "Default Level". The dialogs appear below as follows:
Finally, we’ll create a selector preset to provide three options for the PEQ settings in the lounge
- In the All Presets dialog, click on the Selector tab.
- Create a new Selector preset by clicking on the +Selector button.
- Rename this selector preset to PEQ Preset Selector.
- Add three presets to this selector by clicking the +Preset button three times.
- Change the names of these presets to Soften Vocals, Smooth, and Boost Bass.
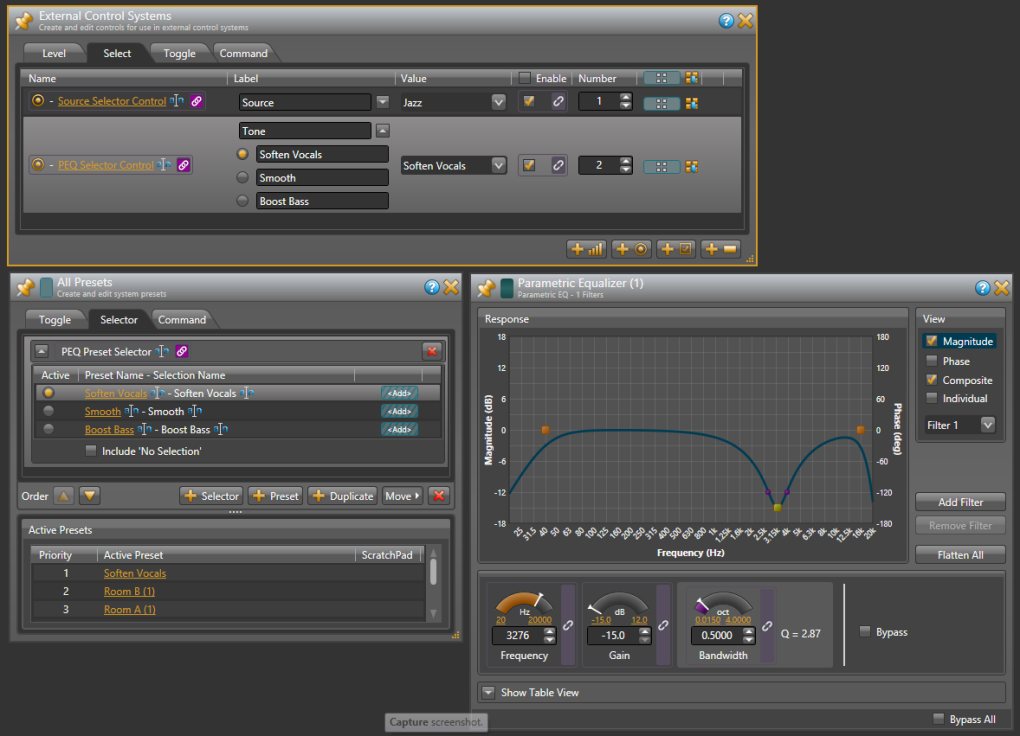
- Activate the Soften Vocals preset by clicking on the radio button to the left of its name in the All Presets dialog. Then uncheck the Include 'No Selector' checkbox at the bottom of the PEQ Selector Preset.
- Open the property dialog for the PEQ block and set the Gain to -15.0 and the Frequency to 3276.
- Add the PEQ block to the Soften Vocals preset – that is the first preset in the selector preset. To do this, drag the blue Preset icon next to the PEQ block in the processing map and drop it on the blue ‘<Add>’ rectangle for the Soften Vocals preset.
- Set the PEQ frequency to 1589 and add the PEQ block to the Smooth preset.
- Set the PEQ frequency to 393, the Gain to +12.0 and add the PEQ block to the Boost Bass preset.
- Test the preset selector by clicking on the Active radio buttons and observing the PEQ change.
- In the External Control Systems dialog click on the Select tab.
- Create a new Selector external control by clicking on the button.
- Rename this new control to PEQ Selector Control and set its number to 2.
- Link the PEQ Selector Control to the PEQ Preset Selector control in the All Presets dialog. Do this by dragging the link icon in the External Control Systems dialog to the right of the control name and dropping it on the link icon for the PEQ Preset Selector control.
- Change the PEQ Selector Control's Label to "Tone". The dialogs appear below as follows:
Wow, that’s the whole configuration. Be sure to save your configuration before quitting Halogen.