Running and Testing the Application
Connecting the Halogen Control Server
Initially, the example application is set up to use Halogen as the Control Server running on the same PC as the Stardraw authoring application. To accomplish this, it configures the HAL1 device in the Stardraw topology to use the PC’s loopback IP address of 127.0.0.1. This IP address always refers to a virtual network address of the current computer. The word virtual in this case means that even though the address is a real IP address, the communications exchanged with a ‘device’ at this address is only routed internally within the PC. No network packets actually travel on a physical network.
To view and change the IP address for the HAL1, change to the Topology window in the Stardraw authoring application by clicking on the Topology tab in the lower left corner. Now, click on the HAL1 (1) DSP Processor block to view its properties. Click on the + symbol next to Control Port to view the settings for the port:
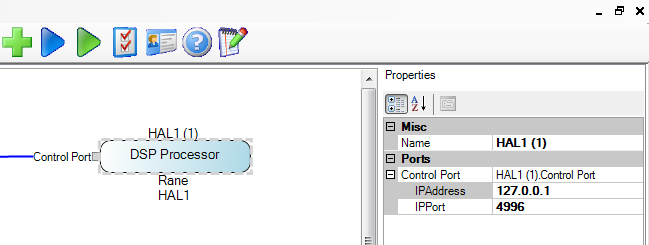
As you can see, the IPAddress is set to the loopback address.
If you want to run Halogen on one PC and the example Stardraw application on another, just change the IPAddress for the HAL1 (1) to the address of the PC that Halogen is running on.
Running the Application
First, be sure that Halogen is running and that the example configuration loaded. To do this:
- Double click on the Halogen Icon on your Windows desktop.
- After Halogen starts, open the example configuration file by clicking the Open button at the top of the Halogen window.
- In the Open Halogen Configuration dialog that appears, navigate to the Halogen Stardraw Example directory and select the ControlSystemSample.hal file.
Now run the Stardraw example application from the Stardraw authoring application by clicking on the blue (Run Project) arrow in the Stardraw toolbar.
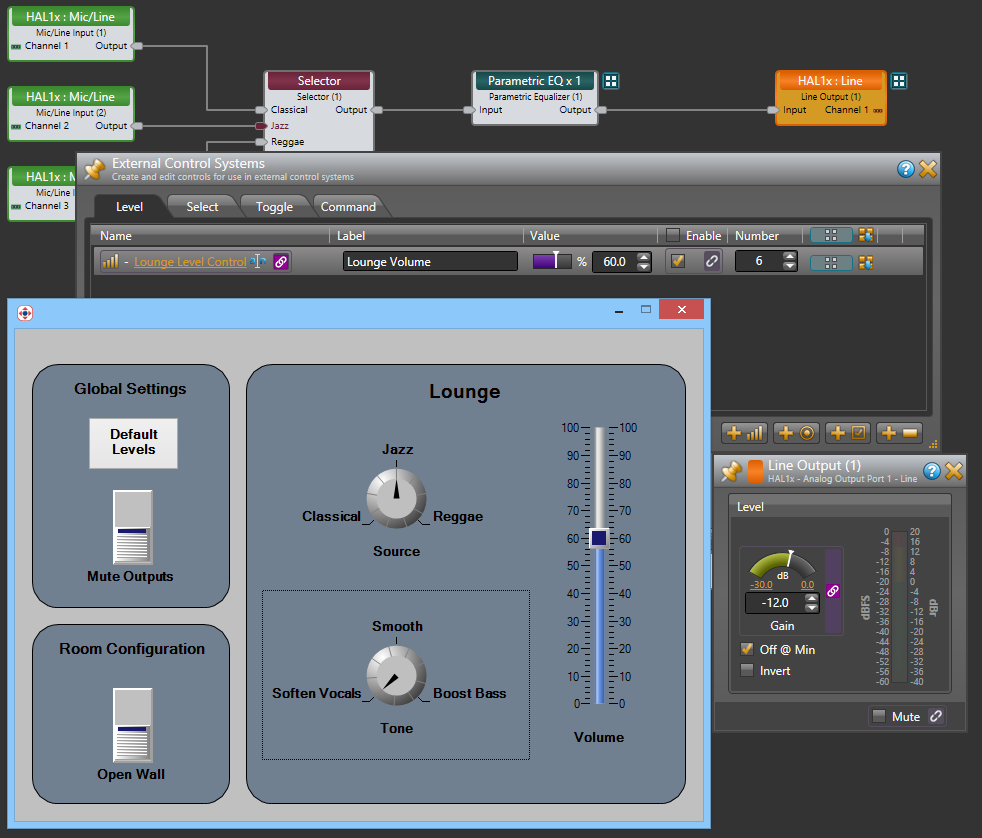
The example form will appear and the controls will match the corresponding external controls in Halogen.
In Halogen, switch to the Processing Workspace by clicking on the Processing tab near the top right of the Halogen application window. Now, click on the Control Systems button then External Controls to open the External Control Systems dialog. Click on each of the tabs, Level, Select, Toggle, and Command to see the configured external controls. To test the controls, change them in either the Stardraw application or in Halogen and observe the behavior of both applications.
For example, to test the lounge volume level control:
- Open the Control Systems dialog on Halogen and click on the Level tab.
- Click on the hyperlink for the control in the Halogen Control System dialog, Lounge Level Control.
- Open the HAL1x Line Output (1) block in the top right area of the configuration’s Processing Map by double clicking on the HAL1x:Line title bar region of the block.
note: Note: The three level controls (The Stardraw Volume slider, the Halogen Lounge Level Control and the HAL1x Line Output (1) level control) are connected to each other and always track together.
- Change any of the three level controls and observe the changes that occur in the Stardraw application and in Halogen. A change made to one level causes the other two to change to the same relative setting:
You can try this out for all of the other controls in the Stardraw example application and the corresponding controls in the Halogen example configuration. Here is a complete list of controls in the example and how they relate to each other:
| Stardraw Application | Halogen Application | |
|---|---|---|
|
Control Name (Control Properties) |
External Control (Control Systems Dialog) |
Operational Control (Linked to External Control) |
| LoungeVolumeControl | Lounge Level Control | Line Output (1) - Level |
| SourceSelectorControl | Source Selector Control | Selector (1) - Selector |
| ToneSelectorControl | PEQ Selector Control | PEQ Preset Selector - Selector |
| OpenWallToggleControl | Wall Toggle Control | Wall (1) – Open Toggle |
| MuteOutputsToggleControl | Mute All Toggle Control | Mute All Preset – Active Toggle |
| DefaultLevelsButton | Default Command Control | Default Level Preset – Assert Command |
Running the Application with a HAL1x
Once you have tried out the example Stardraw application with Halogen and have a HAL1x available, you can switch to using the HAL1x as the Control Server. The simplest way to do this is to connect your PC and your HAL1x to the same network using an Ethernet switch. Minimally, the components of this network are:
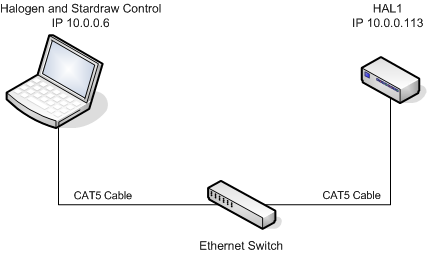
The IP addresses shown are examples, but it is important that the PC and the HAL1x have compatible addresses. We suggest that you configure a static IP address on the HAL1x that is compatible with the PC’s network. That is, both the PC and the HAL1x are on the same subnet. For example, if your PC has an IP address of 10.0.0.6 and a subnet mask of 255.255.255.0, you could configure your HAL1x to have a static IP address of 10.0.0.129, with a subnet mask of 255.255.255.0. For information on how to set HAL1x’s static IP address and subnet mask see To connect to the HAL external control server… in Appendix B: Using PuTTY to Test External Control Systems.
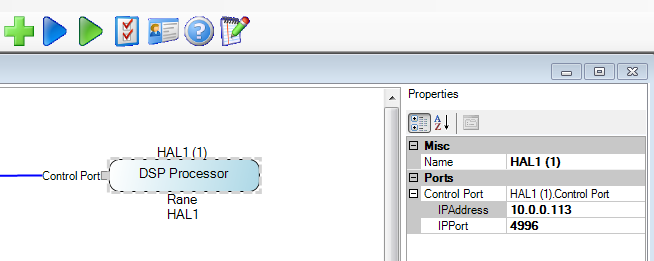
Once your PC and HAL1x are on the same network, you need to configure the Stardraw application to use HAL1x’s IP address. To do this, change to the Topology window in the Stardraw authoring application by clicking on the Topology tab in the lower left corner. Now, click on the HAL1 (1) DSP Processor block to view its properties. Click on the + symbol next to Control Port to view the settings for the port and change the IPAddress to the address of your HAL1. In following example it is set to 10.0.0.113:
To get everything running:
- In Halogen connect to your HAL1x. Do this by clicking the Connect button in Halogen, then clicking on the Connect button in the Connect to Device window that appears.
- Load the example HAL1x configuration. Do this by clicking on Halogen’s Load button and selecting the example configuration file, ControlSystemSample.hal, included in the Stardraw Control support package.
- Start the Stardraw Control example application by clicking on the blue (Run Project) arrow in the Stardraw authoring application.
Now the Stardraw application is connected to the Control Server on your HAL1x. If you operate the controls on the Stardraw application panel, for example, the Stardraw HAL1 driver sends messages to the HAL Control Server, which change the corresponding controls in your HAL1x.
At this point you could disconnect Halogen from the HAL1x or even close Halogen because the Stardraw application communicates directly with the HAL1x and Halogen is no longer required as part of the control system.